Blogs | Expert Insights on Property Refurbishment & Renovation
Introduction
Small kitchens can feel cramped if they lack proper organization. That’s why kitchen storage ideas for small spaces matter so much. By tackling clutter, you can make mealtime more pleasant. Ideas for storage in small kitchen layouts should focus on the smart use of every surface. Even corners can shine when organized.
How to Maximize Storage and Organize a Small Kitchen: A Quick Guide
Many people think they lack options when cooking in a tiny area. But if you plan well, you can maximize storage and lighten the load on your counters. Storage ideas for small kitchens often start with sorting what you truly need. This method helps you keep your space tidy to focus on meal prep without clutter. By organizing your kitchen efficiently, you can optimize the available space, making it feel more spacious and functional. Simple changes like using vertical storage on wall space or investing in multi-purpose furniture can enhance your kitchen’s efficiency while freeing up more counter space for cooking and prep.
Small Appliances and Kitchen Tools Tactics
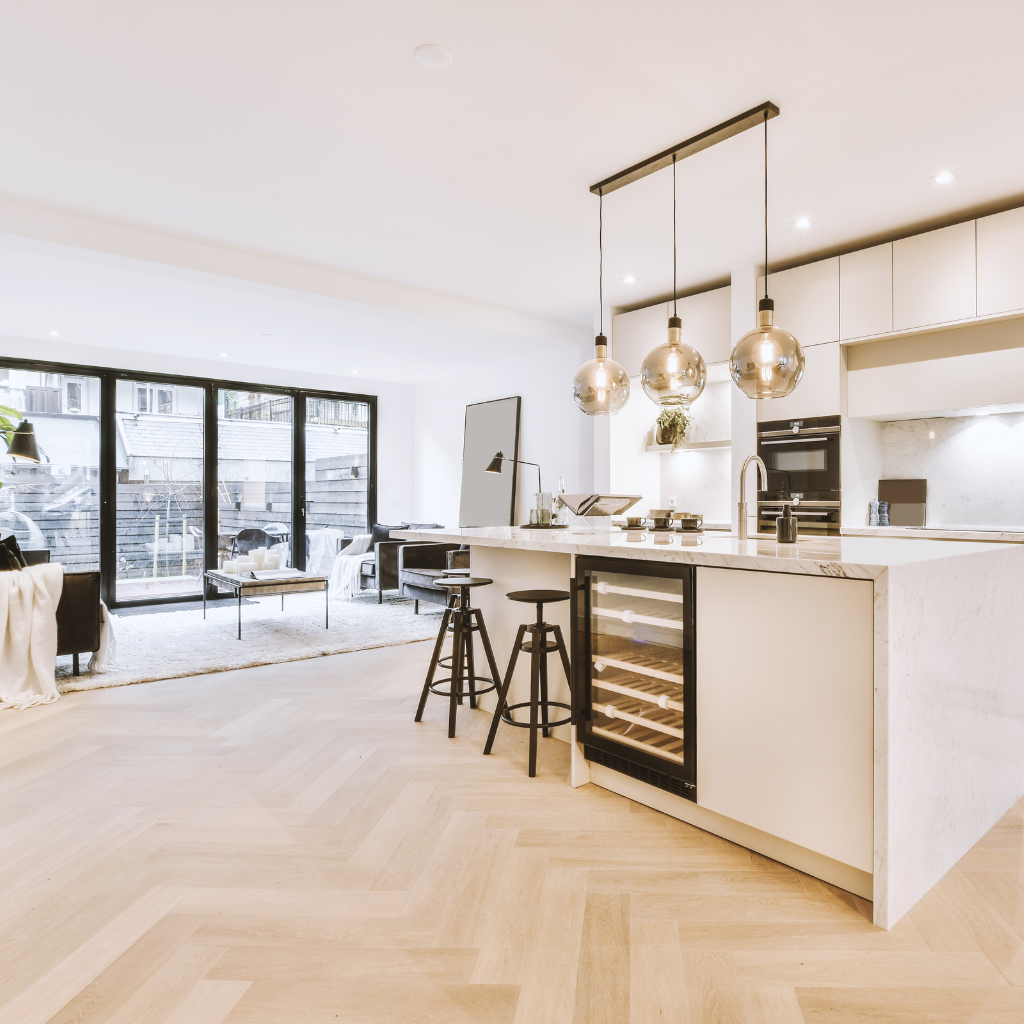
Stashing small appliances and kitchen tools can be challenging, but a bit of strategy helps. Look at each item’s size and how often you use it. Place heavy pieces like pots and pans closer to the counter to avoid bending usually. For larger appliances like slow cookers, consider kitchen cabinets or over-the-fridge cabinetry—a great place to store those items. A few hooks can also hold measuring cups or kitchen utensils, and you can hang pots to save valuable cabinet space—group related kitchen items in labelled bins, such as all baking tools, in one container. Items like bottles, vinegar, or drinks can be stored in trolleys or tucked away in cabinetry for easy access. For vegetables, you could use pullout drawers or dedicated shelves. You can also use the space next to your oven, stove, or refrigerator to store items like dishware and small appliances. Organizing your kitchen tools and creating a simple system for storing stuff will prevent clutter and make everything accessible, ensuring your kitchen remains functional and tidy.
Making Drawer Space Work in Your Storage in a Small Kitchen
Drawers can turn chaotic if they hold too many random things. Sort utensils into caddies or trays so you can see them quickly. Put spatulas or spoons in one section and knives in another. Use deeper drawers for mixing bowls or cutting boards—this reduces rummaging. Sometimes, you can add sliding racks inside drawers for multiple storage layers. Take advantage of the sides of the drawer for extra additions like spice jars or smaller kitchen tools. If possible, measure your drawer space and decide on snug organisers. This helps you keep everything neat and in its place, so nothing is out of sight. A well-thought-out drawer system can increase your storage capacity and work wonders for storage ideas for kitchen storage in a small kitchen. By organizing regularly, you reduce clutter and make your kitchen a lot more functional.
Wall Storage and More: Turn Your Backsplash into Storage
If you’re tired of struggling with clutter, wall storage can change your kitchen’s look. Instead of letting walls go unused, turn your backsplash into storage. Hang cups, spoons, or spices at eye level. Keep your counters open to chop, mix, or plate food without obstructions where you prep meals. For more creative ways to enhance your kitchen layout, check out this guide on transforming your kitchen with inspiring kitchen island ideas.
Using Open Shelves for a Small Kitchen Storage Idea
Open shelves are a great small kitchen storage idea that brings flair to your cooking area. Arrange the most used items like plates or mugs for easy access. To create a charming display, you can store items like glass jars full of pasta or rice. Consider grouping items by colour or type to make them pop. A compact step stool helps you reach everything if your shelves are high. Keep fragile glassware in stable spots so they don’t risk tipping. Rotate what you store items on open shelves based on the season, so you only display what’s useful. This approach can make all the difference, providing extra space and more space for essentials while keeping your kitchen stylish and efficient.
Turning the Kitchen Wall into Extra Counter Space
Another trick for cramped kitchens is using the kitchen wall for extra counter space. Wall-mounted fold-down tables can serve as a prep station and tuck away when unnecessary, saving valuable kitchen space. You can also install shelves or a narrow shelf under cabinets to hold small containers, making the most of unused space. For easy access to measuring spoons or cutlery, add magnetic strips below eye level—these strips also work for knives, freeing up drawer space. Analyze every inch of your backsplash and see if racks, rails, or caddies might fit. Going vertical opens new pockets of space in just wasted space. Open shelving on the walls can give easy access to items like food storage containers while offering a sleek, designer touch. You can also incorporate shelf risers to double your storage space on existing shelves. The best part of these clever storage solutions is that they create extra storage without taking up more cabinet space. With these ideas for storage in small kitchens, you can enjoy plenty of space to store everything without overcrowding your dining room or appliance storage area. These helpful ideas save space and bring beauty and functionality to your kitchen.
When you look into your kitchen cupboard, you may see wasted space. With well-thought-out adjustments, that cupboard can hold twice as much. Consider stacking shelf inserts or a lazy Susan for condiments. Smart placement and grouping of items create new ways to keep chaos away in any small kitchen.
Storage Containers for Food Storage Essentials
Choosing sturdy storage containers makes food storage more manageable and tidy. Pick stackable sets that can hold beans, flour, or cereals. Transparent boxes let you see at a glance how much remains. Store taller containers toward the back if you have varied heights on your shelves. To save even more room, consolidate half-empty packages into a single container. Label everything so you grab the right product the first time. This approach reduces spoilage and cuts down on rummaging through messy bags. Organized containers transform your cupboard from a risk of spills to a streamlined zone. For added organization, consider installing a magnetic knife rack to keep your kitchen tools easily accessible and your counters clutter-free.
A Storage Solution to Protect Kitchen Appliances
Larger kitchen appliances need a storage solution that keeps them safe yet handy. Place a stand mixer or air fryer on sturdy lower cabinets or shelves so lifting isn’t a hassle. You can add a pullout tray or sliding slots for quick access if you have space below your countertop. For small kitchen appliances, utilize vertical stacking with racks that separate items by size, such as your favourite kitchen utensils or spice jars. Keep cords neatly coiled and stored in baskets to avoid tangles and breakage. Rearrange smaller appliances and pantry items in a way that makes them easily accessible while still saving space. Giving each device a defined home extends its life and frees up counter space, making your kitchen feel organized and calm. This planning makes a small change that can make a big difference. You can also customize storage solutions to fit dry goods, oven mitts, or decor on the stovetop or cooktop. These storage ideas for small spaces ensure everything has a place, keeping your kitchen efficient and tidy.
Overcoming Dead Space with Smart Storage Tactics
Dead space lurks in corners, above the fridge, or beneath cabinets. Smart storage practices uncover these hidden spots for pots, pans, or bags of flour. You can build custom shelves or slide-out drawers to reach those areas. With some planning, every odd nook can serve a purpose. For more inspiration on maximizing space in your home, look at these basement home office ideas to inspire a functional and stylish workspace.
Hidden Shelves Behind Cabinet Doors
Cabinet doors aren’t just for opening and closing—they can be a hidden storage goldmine. Attach slim shelves inside or small hooks for measuring spoons, pot lids, or cutting boards. You can use magnetic bars for metal spice tins or pantry staples, keeping them within easy reach while clearing up counter space. If you’re short on the pantry room, mount narrow racks behind doors for foil or plastic wrap. These clever storage ideas for kitchens can help keep things neatly tucked away yet easily accessible when needed. For tiny kitchens, lightweight containers for cleaning supplies might also hang beneath the sink cabinet door, taking advantage of often-overlooked space. Similarly, upper cabinets can have drawer dividers to neatly store utensils or small appliances. If you have a window or ceiling space, consider installing a bookcase or mirror to use vertical space. You can slide out additional storage in kitchen islands to further maximize space. With these storage hacks, you can transform even the most cramped kitchens into functional, organized spaces.
Multifunctional Pieces that Expand Usable Space
When your kitchen is short on square footage, furnishings that serve multiple roles are lifesavers. A small cart can function as a prep table, storage bin, and rolling island all at once, offering additional space and flexibility. Consider a bench with an opening seat to store extra linens, trivets, or crockery. Collapsible tables can fold away, opening up more floor space for foot traffic, while mounting hooks or a pot rail above the countertop can free up valuable storage for cookware. Some stools even contain cubbies for cookbooks or recipe cards, turning them into seating and workspaces. Think about how each item you buy can wear more than one hat. By focusing on furniture that does double duty, you’ll see the dead space vanish, and daily tasks become smoother. This clever use of space can even be extended to areas like the garage or house, where you can store extra kitchen supplies or storage ideas for a small kitchen. It’s all about maximizing the functionality and power of every piece.
Essential Organization Ideas for Pantry Perfection
A well-managed pantry can save you precious minutes when cooking. Group similar foods or seasonings together so you find them fast. Organization ideas prove vital since small kitchens rarely have a walk-in pantry. Explore these kitchen remodels to Shape Your Dream for smart ways to make the most of limited space. Even a single closet space can hold more when arranged logically for easy use.
Clear Bins and Simple Labels
Sometimes, the simplest solutions are the most powerful. Clear bins let you view everything at once, which helps you reach for what you need without digging. Label each bin with the ingredient type or meal category, like “pasta” or “baking.” This labelling process spares you from rummaging through random packages. The group frequently used items in front for quick grabbing. Bins also stack neatly so you can use vertical space, a great tip for food storage ideas for the kitchen. Consistent containers keep shelves looking tidy and help prevent spills. You can reorganise or restock with clear bins and labels in mere minutes, ensuring your kitchen stays organized and functional.
Sorting Seasonings and Everyday Ingredients
Herbs, spices, and daily cooking staples deserve their tidy zone. You can hang a spice rack inside your pantry door or line jars on a narrow shelf. Categorize them by cuisine or alphabetically if that’s easier. Keeping favourite seasonings in one place saves time when you’re in the middle of dinner prep. Pour flour or sugars into labelled canisters to prevent spills from torn bags. Create mini caddies for items like tea bags or snack bars so they’re always within sight. This thoughtful arrangement ensures your pantry stays functional and stress-free.
Storage Ideas for a Small Kitchen: Best Ways to Keep it Tidy
When space is tight, every decision affects your kitchen’s flow—storage ideas for a small kitchen focus on grouping items sensibly and removing what no longer serves you. The best storage ideas for small kitchen layouts ensure you can grab pots, spices, or plates in seconds. For creative, space-saving inspiration, check out these loft kitchen ideas that show how smart design can transform even compact areas. It’s about convenience and ease.
Folding Counters to Handle Small Spaces
A folding counter can act as a built-in helper. Pull it down to chop veggies, then lift it away when it’s time to move around. This saves steps and prevents cramped elbows. Install sturdy hinges and ensure the surface locks in place. Combine a foldable counter with small shelves underneath to stash mixing bowls. A fold-down space can double as a quick breakfast bar if you have children. You can also place built-in trash bins below so scraps go straight. With this resourceful arrangement, you can free your main counter for real cooking and make the most of your kitchen’s layout. These are excellent kitchen storage ideas for small spaces, making the most of every square inch while keeping the space functional.
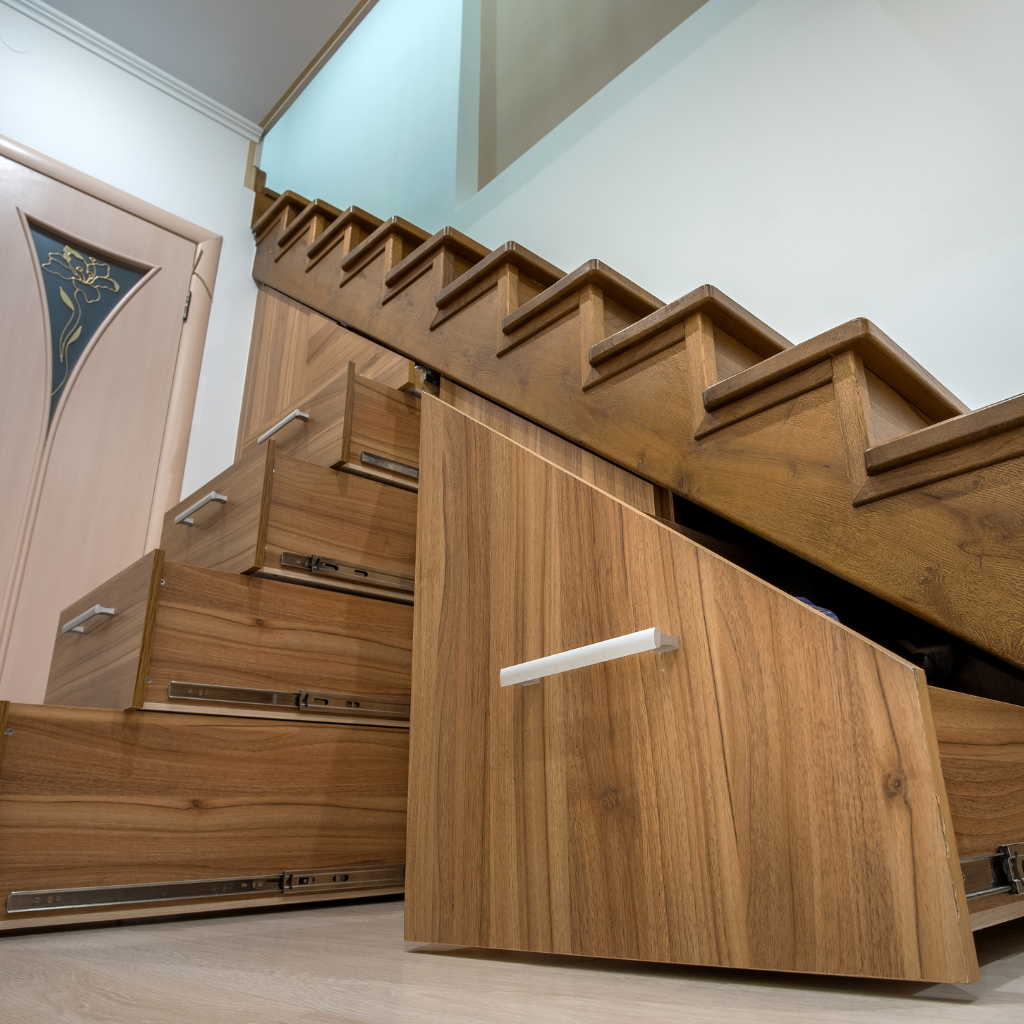
Corner Drawers to Solve Odd Angles
Corners often become wasted areas that gather dust. Installing corner drawers can double the amount of storage space in your kitchen. Each drawer gently snakes around the angle, offering extra compartments for utensils or dish towels. You’ll be surprised how many items you can find room for in these deep pullouts. Keep daily cookware in easy-to-reach layers, with heavier pots at the bottom. If your corner sits near the sink, consider adding hooks for sponges or detergent. Opt for stylish pullouts or finishes that complement your kitchen’s aesthetic to add character. For a tight layout, each inch counts. You avoid awkward gaps by picking corner drawers, maximizing your kitchen’s potential. Embrace that tricky angle and watch your storage capacity jump!
Conclusion:
The best transformations come from seeing every inch as a chance to create order. Food storage ideas for small kitchen setups, clever shelving, and targeted decluttering give you more room to breathe. Our property refurbishment team can guide you from planning to installation so you never feel cramped. Ready to revive your kitchen? Call us today, and let’s build a space you’ll love.
Everyone wants a kitchen that feels welcoming and works exactly how they need it to. Cooking meals, spending time with family, and chatting with friends all happen in this room. If your space feels cramped or outdated, you might be eager for a change. Kitchen remodeling ideas can solve many problems. You can open up the area, add clever storage, or update worn surfaces. This guide will share simple tips about kitchen design remodel plans, small kitchen remodel solutions, and ways to get the most from your layout. Even with a limited budget, you can turn your cooking zone into something special that reflects your style. Read on to discover how to plan, choose materials, and work with professionals who offer kitchen remodeling services. By following these steps, you can shape a cozy and attractive space that suits your lifestyle.
Kitchen Remodel: Transformative Kitchen Design Ideas for Any Home
A kitchen remodel can be a big deal, whether you have a tiny nook or a wide-open layout. The goal is to blend function with beauty, so you can move around easily and still enjoy the look. Think about your cooking style, the items you use most, and the mood you want. Working this out early will save you stress later. Look at color, storage, and lighting to figure out what works best. If your home needs more seating, consider an island or extra counter space. When you pick out features like cabinets and appliances, be sure they work with your taste. You do not have to choose fancy stuff if it does not fit your vibe. A thoughtful approach can result in a style that endures through changing trends. Keep your wants and needs balanced, and you will be on your way to a successful kitchen makeover.
Kitchen Layout Ideas That Maximize Workflow
Where you place your stove, fridge, and sink affects how you move around. This zone is sometimes called the work triangle. Keeping these three points in a sensible arrangement can help you cook faster and enjoy it more. Some people like an L-shaped plan, while others prefer a galley style. If you have a big area, you might add an island for baking or meal prep. For a small kitchen remodel, tuck storage along walls to keep floors open. Try not to let cabinets block windows or crowd walkways. In many kitchen layout ideas, good flow means fewer trips back and forth. Keep often-used bowls or spices close to the stove, and store big pots near the sink. Each choice should make sense for the way you live and cook, so you can glide from one task to the next with ease.
Small Kitchen Remodel Concepts That Spark Creativity
If you are tackling a kitchen remodel for small kitchen needs, your strategy might focus on tricks to free up space. Going bright with paint and countertops can make the room look larger. Use glass doors on certain cabinets to draw the eye inward and keep the area feeling open. Vertical storage is your friend, so install tall shelves or racks to keep clutter away from counters. Pull-out cutting boards add an extra workspace if you want to chop snack items in a jiffy. You might even pick smaller appliances that do double duty, like a microwave combo oven. Simple changes like better lighting and slim chairs can make tight spaces feel comfy. Take the time to measure carefully and choose only the items you really need. That way, your small kitchen remodel ideas can make the most of every corner.
Timeless Cabinet Choices to Kickstart Your Kitchen Makeover
Cabinets are often the biggest focal point in a kitchen. If they look dated or worn, your entire space might feel tired. Luckily, changing them can breathe new life into your kitchen makeover. When picking cabinet styles, many folks go for a timeless look that will not become dull fast. Neutral finishes like white or gentle grays can match almost any decor. But do not be afraid to test bold colors too, like a soft navy or forest green. The key is to ensure that they blend well with your backsplash, floor, and other details. You can go fancy with raised-panel doors, or keep it simple with flat fronts. Storage is vital, so think about roll-out trays or built-in dividers. That way, you are not only getting a fresh look but also making it simpler to stow things away. A well-chosen cabinet style sets the tone for your entire remodel.
Kitchen Cabinets That Solve Storage Woes
Smart kitchen cabinets can save you from daily hassle. Deep drawers are great for pots and pans because you can see everything in one glance. Pull-out shelves let you reach items at the back without hunting around. Some folks love corner carousels that spin, which help you use every bit of odd space. Consider little racks on the backs of doors for spices or cleaning tools. If you have tall ceilings, think of adding an extra row of cabinets for seasonal kitchenware. A well-planned system can make your life easier, especially for those who cook a lot. By working these storage ideas into your remodel, you will enjoy a neat and efficient kitchen.
Ideas to Renovate With Hardware and Finishes
Sometimes, small changes can bring big results. Swapping out cabinet knobs or drawer pulls is a quick way to revamp your kitchen style. You might pick matte black if you like a dramatic punch, or choose vintage brass for warmth. These pieces act like jewelry for your cabinets. Think about finishes that match your overall theme, whether it is modern, rustic, or classic. Also, remember that shiny surfaces may show fingerprints more easily. Add a soft-close feature if you dislike hearing door slams. Mixing up metals is popular now, so do not be scared to blend stainless with brushed gold. These upgrades are easy to tackle even if you are not doing a full kitchen remodel. A simple tweak can give old cabinets a fresh spin.
Countertop, Backsplash, and Floor Trends for the Best Kitchen
Flooring, counters, and tile can change the entire feel of your kitchen. These surfaces do the hard work, from catching spills to facing daily foot traffic, but they also set the style. Many folks aim for materials that are both strong and good-looking. You can pick patterns or stick to solids; it all depends on your taste. Maybe you want the best kitchen possible with top-tier finishes. Or perhaps you prefer an easy-to-clean option that will not break the bank. You can also pair a bold backsplash with a neutral floor or do the opposite. Balance is the key. If the floor is eye-catching, let the counters be calm. That way, each element can shine without overwhelming the space.
Comparing Marble Countertops and Quartz Countertops
Marble countertops have a fancy, unique look with natural veins that people find beautiful. But you need to be gentle with them, since marble can stain or scratch if you are not careful. On the other hand, quartz countertops are engineered to resist scratches and spills better. They can mimic marble or other stones while holding up against daily use. If you do not want lots of upkeep, quartz may be your style. Both options come in many colors and patterns, so you can match your kitchen ideas to your personal favorite.
Backsplash Design Ideas That Spark Personality
Backsplashes provide a perfect spot to experiment with color and texture. You can go subtle, like white subway tiles, or step out with something colorful and exciting. A metallic backsplash can reflect light and add flair, while stone tile brings in an earthy element. If you prefer a smooth appearance, think about using the same slab material for both the counter and backsplash, which visually connects everything. Small mosaics also create interesting patterns without taking up too much space. No matter your pick, a backsplash protects the wall behind the stove or sink. It is a stylish way to show off your design ideas without going overboard.
Kitchen Remodel Ideas for Outdoor Kitchen and Beyond
Sometimes, cooking is not just for indoors. An outdoor kitchen can open up new ways to enjoy meals and gatherings. You might have a small grill corner or a full setup with counters and a sink. Outdoor kitchens need materials that stand up to rain and heat, so choose carefully. Also, consider lighting so you can cook at night. Beyond that, you might have odd corners in your house that you want to turn into a functional space. Maybe you have a narrow hallway or a nook without electricity. Special solutions can fix these tricky spots. A well-planned outdoor kitchen or unique layout can expand your cooking fun and let you see fresh possibilities for your home.
Style Kitchen Spaces in the Fresh Air
Setting up an outdoor cooking zone can be simple or grand. Some folks just add a sturdy grill and an outdoor table for gatherings. Others install built-in cabinets and mini-fridges. Water-resistant countertops and a proper cover keep things lasting longer. If you are big on hosting, think about comfy seating and shade for guests. Try not to crowd the area so people can walk around. Because outdoors can be dusty, choose materials that wipe clean easily. Do not forget about lighting, whether string lights for ambiance or a bright spotlight for the grill. Little by little, you can create a stylish place to serve up meals under the sky.
Kitchen Update Solutions for Tight Fits
Odd-shaped kitchens or spaces with low ceilings call for creativity. You might place shelving around structural beams or install custom cabinets that fit right into crooked corners. Bright paint can help low rooms feel taller. If your layout is very narrow, consider stacking appliances in a special tower. Glass doors can help create depth. Sliding or pocket doors free up space that a traditional door would take. Keep an eye on how the light moves in your room and place reflective surfaces to bounce it around. Every kitchen deserves a chance to shine, even if the shape is unusual. A good plan and the right pieces can solve tricky problems and give you plenty of cooking space.
Navigating Full Kitchen Remodeling Services Like a Pro
Working with professionals can make your kitchen ideas for remodeling flow much smoother. Sometimes, you may try to do it all yourself, but big projects often go better with a trusted team. Expert kitchen remodeling services can help with design, permits, and the actual construction. It is wise to check reviews, credentials, and past work so you know your crew has experience. Communicate your budget and timeline clearly, then keep track of progress as the project moves along. If something is not right, mention it early before it becomes a larger issue. A good partnership means you get results that match your vision. Doing it right from the start will save money and headaches down the road.
What to Expect During a Full Kitchen Remodel
A full kitchen remodel often begins when workers tear out the old cabinets, counters, and appliances. Then the space might be re-framed if walls need adjusting. Next come plumbing and electrical changes before new cabinets are installed. Floors usually go in either before or after the base cabinets, depending on your contractor’s plan. Once the countertops are set, appliances can be placed, and final touches like paint and backsplash are handled. You might have to set up a temporary kitchen somewhere else in your home, so plan for that. Each step takes time, so stay patient. In the end, you will have a new room that suits your everyday needs and showcases your style.
Selecting the Best Pros for Kitchen Remodeling Services
Finding the right team involves a bit of research. Ask friends or neighbors for referrals, and explore online reviews. Look at photos of similar projects so you can see if their style matches yours. Always check that they are licensed if your region requires it, plus ask about insurance. Talk to at least a couple of pros to compare their quotes and approaches. A good contractor answers questions and explains the process in terms you can understand. Also, be sure to sign a clear contract that lays out costs, materials, and deadlines. At every point, be open about what you want. These steps help you avoid hassles and boost your confidence in the final outcome.
Conclusion: Achieve an Amazing Kitchen with Confidence
A kitchen remodel can seem like a huge job, but with clear goals and a solid plan, you can do it without feeling overwhelmed. Start by thinking about what you need most, whether that is extra prep space, better appliances, or modern cabinets. Explore solutions that fit your style, then talk with professionals who understand your vision. Every step, from choosing materials to settling on a layout, moves you closer to a cooking area you will love. Even if surprises pop up, keep communicating and adjusting your plan. In time, you will end up with a space that looks great, works well, and truly feels like home. Keep your dreams in mind and enjoy the ride. Your new kitchen is just around the corner.
Introduction
Kitchen island ideas can reshape any home by bringing folks together in one central spot. An island becomes a natural gathering place for snacks, conversation, and meal prep. It also offers added countertop space for cooking tasks and easy serving. Many people find that one good kitchen island idea can brighten a room, especially with fresh colors or unique materials. Whether your space is huge or tight, you can personalize an island to fit just right. This blog aims to share tips so you can customize your island and make each meal more fun.
Exploring the Size of a Kitchen Island for a Modern Kitchen
Figuring out the size of a kitchen island takes some thought. You want enough space to move around it without bumping into appliances. A modern kitchen might have sleek lines, so measuring clearance is key. Think about your cooking style, too. If you love baking, leave room for a wider work surface. If you host parties, plan for extra spots where people can stand or sit. A balanced island size should match your home’s flow, so it feels comfortable. Adjusting the length and width can create a well-designed focal point for both cooking and conversation.
Incorporating Island Kitchen Ideas into Your Layout
Island kitchen ideas often start with a clear path around the island, sometimes called kitchen layout ideas with island additions. Look at where doors open, where the sink sits, and which appliances you use most. Keep these zones in mind, so the island works with your workflow. Some folks like a center island, while others prefer an offset design if the room setup is unique. An island can also form a nifty border between cooking and dining areas, giving each zone its own feel. The right layout will help your island become a helpful partner in daily tasks.
Modern Kitchen Island Ideas for Timeless Appeal
You can keep things simple with modern kitchen island ideas that focus on subtle details and clean lines. Sleek cabinetry and smooth surfaces give the island a polished look. Consider adding under-counter lighting to highlight the base and create a soft glow. Choose materials like quartz or concrete for a minimal feel. Some folks like an edgy contrast, such as dark cabinet paint with bright countertops. Others go for a single color scheme, so the island blends with the rest of the room. Whatever your approach, a modern vibe can last for many seasons without ever looking dated.
Design Essentials: Kitchen Island with Seating and More
A kitchen island with seating can turn meals into social events and pasta nights into cozy gatherings. While design is crucial, comfort matters, too. Ensure each seat has enough leg space and people aren’t squeezed together. This helps guests relax around the counter. Beyond seating, it’s smart to plan for outlets or small shelves, so the island can handle everything from phone charging to storing cookbooks. A blend of smart design and everyday function makes the island a lively place to gather. Little touches, like matching stools to your color palette, can tie the look together nicely.
Kitchen Island Design Ideas for the Perfect Kitchen
Kitchen island design ideas aim to create the perfect kitchen by balancing form and function. If you like a cheery look, choose lighter cabinet finishes that reflect natural light. For a rustic twist, think about wooden countertops or reclaimed timber posts. Bold hardware can add spark, whether it’s bright brass or matte black. Mixing textures—like a smooth countertop with a stone base—brings depth. Bay windows or open shelving near the island can further enhance the look. With thoughtful design, your island becomes the room’s heart, stylishly unifying your overall theme.
Kitchen Ideas with Island for Any Home
Many homes benefit from kitchen ideas with island plans. Even if your space feels compact, a narrow island can still hold essential items. You can also add wheels for a rolling island that’s easy to move. If more square footage is available, try a double island setup. This separates cooking tasks from serving or eating. Some folks use one side for meal prep and the other for seating. Whether it’s a simple rectangle or a fancy split-level, an island adapts to how you live. When it’s well-placed, it can really anchor the entire space.
Island Worktop Choices for Style and Function
Your island worktop is the main surface you’ll see and use daily. Materials vary from laminate to granite, but each option shines in its own way. Wood tops bring warmth, while stainless steel feels clean and modern. If you need durability and easy cleanup, quartz is a popular pick. Consider how often you cook, whether it’s messy sauces or simple sandwiches. Smooth worktops with fewer seams help with wiping down spills. Experiment with color combos for a unique finish, but test samples in your actual lighting first. A well-chosen worktop can add lasting beauty while standing up to daily tasks.
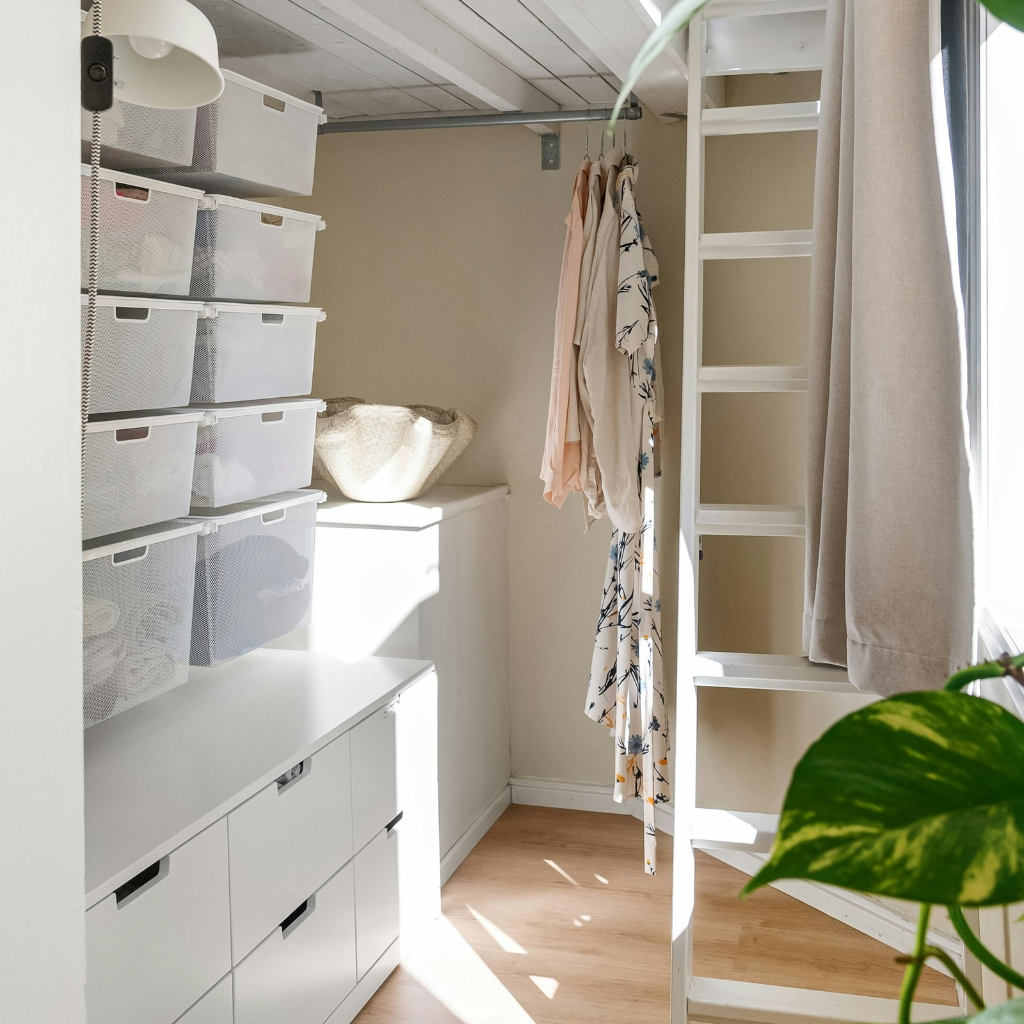
Storage Ideas to Transform Your Small Kitchen
Storage ideas are especially important if you have a small kitchen. Hanging pots and pans on rails or using open shelving can save valuable cabinet space. Magnetic strips along the island’s side can hold knives or utensils. Even a slim island can host drawers on one side, tucking clutter out of sight. Pull-out trays or rotating shelves add extra function. Consider vertical space by installing hooks or cubbies above the counter. These little tweaks make even a tiny spot feel more open and organized. Simple changes often lead to a big difference in the overall look and workflow.
Small Kitchen Ideas with Island for Better Organization
Small kitchen ideas with island elements don’t have to be complex. Sometimes, a basic rectangular island with a butcher block top is enough to boost your cooking space. Tuck baskets or bins underneath for vegetables and cleaning supplies. If you can, place the island near the fridge to cut down on steps during meal prep. For more inspiration, check out these kitchen remodel ideas to shape your space, which offer creative solutions to make the most of limited space. Think about color, too. Lighter hues on the island can make the room seem larger. You could also add a narrow spice rack to one side. These modest changes can streamline tasks, so you spend more time enjoying meals and less time juggling clutter.
Small Kitchen Island Ideas that Boost Efficiency
Small kitchen island ideas often focus on making every inch count. One approach is to add foldable countertops that extend when needed and fold away after use. Another idea is to embed appliances, like a mini wine fridge or a modest cooktop, right into the island. This reduces the need for separate stands or counters. Some even use a convertible table mechanism that flips up for dining. These creative features make your island work smarter, not harder. With the right design, a tiny space can still have plenty of room for cooking, eating, and chatting.
Island Idea: Keeping It Cozy in Tight Spaces
An island idea that emphasizes coziness fits well in areas where space is limited. If you can spare a corner, consider an L-shaped island that hugs two walls. Add a soft cushion or bench along the edge so a friend can sit and keep you company while you cook. Use open shelves on the outside for a few cookbooks or a small plant. Decorative hooks can hang mitts or spatulas in easy reach. These homey touches make the area feel warm, which helps family and friends feel welcome. A snug island can be both functional and friendly.
Inspiring Kitchen Island Ideas: From a Curved Kitchen Island to a Marble Kitchen Island
Sometimes, small design tweaks add major flair, while other times, bold choices steal the spotlight. A curved kitchen island can soften angles and bring new flow to a room. A marble kitchen island adds a hint of luxury with its natural, swirling patterns. Both options turn heads. Mix in open shelving or built-in appliances, and you can create a one-of-a-kind showpiece that’s both pleasing and practical. Whether you want a gentle arc or a polished marble top, these ideas let your island stand out in a memorable way. With a dash of imagination, you might reinvent your entire layout.
Kitchen Islands That Shine with Kitchen Island Lighting Ideas
Kitchen islands become even more inviting with the right lighting. Pendant lights are popular because they offer both style and focus on your main work area. You could also place LED strips underneath the countertop for a subtle glow. Recessed lights are another solution if you prefer a clean look. Dimmer switches let you shift between full brightness for meal prep and a softer glow for late-night snacking. With fresh kitchen island lighting ideas, you can set the mood for daily tasks or family get-togethers. The key is layering different light sources so everything looks well-balanced.
Curved Kitchen Island and Marble Kitchen Island: Eye-Catching Focal Points
A curved kitchen island can feel gentle on the eyes, making corners less abrupt and guiding people through the space. It pairs well with light textures and soft color palettes, turning the island into a friendly centerpiece. Meanwhile, a marble kitchen island offers timeless beauty. Each slab has unique veining, so you get a natural art piece in your cooking area. Marble does require care, such as wiping spills quickly to avoid stains. But the result can be a standout showpiece. Curved edges or classic marble, either option holds a lot of star power in your kitchen.
Elevate Any Space with Bold Kitchen Ideas
Sometimes, you just want a splash of something unexpected. Bold kitchen ideas can include bright island paint or eye-catching tile along the base. Even small changes, like colored barstools, add personality. You can also experiment with mixed media, such as wood, glass, or stone. For creative design inspiration, explore these loft kitchen ideas, which offer fresh ways to blend style and function. Don’t shy away from patterned backsplashes that speak to your taste. If your area is small, you can still inject style with a single accent color or a playful light fixture. Whether you’re after subtle drama or big statements, clever design choices keep your kitchen from blending into the background.
Conclusion: Building Your Dream Kitchen Island
Picking the right island is a personal process. Some focus on function, while others aim for a bold statement piece that sets the tone. Your dream kitchen island might have extra storage, built-in appliances, or lots of cozy seating for family gatherings. Be sure to measure your space and think about how you prefer to cook and mingle. The island should match your pace of life. Whether it’s a curved showstopper or a simple workhorse for meal prep, the possibilities are almost endless. By crafting an island that truly fits you, the heart of your kitchen can grow stronger each day.
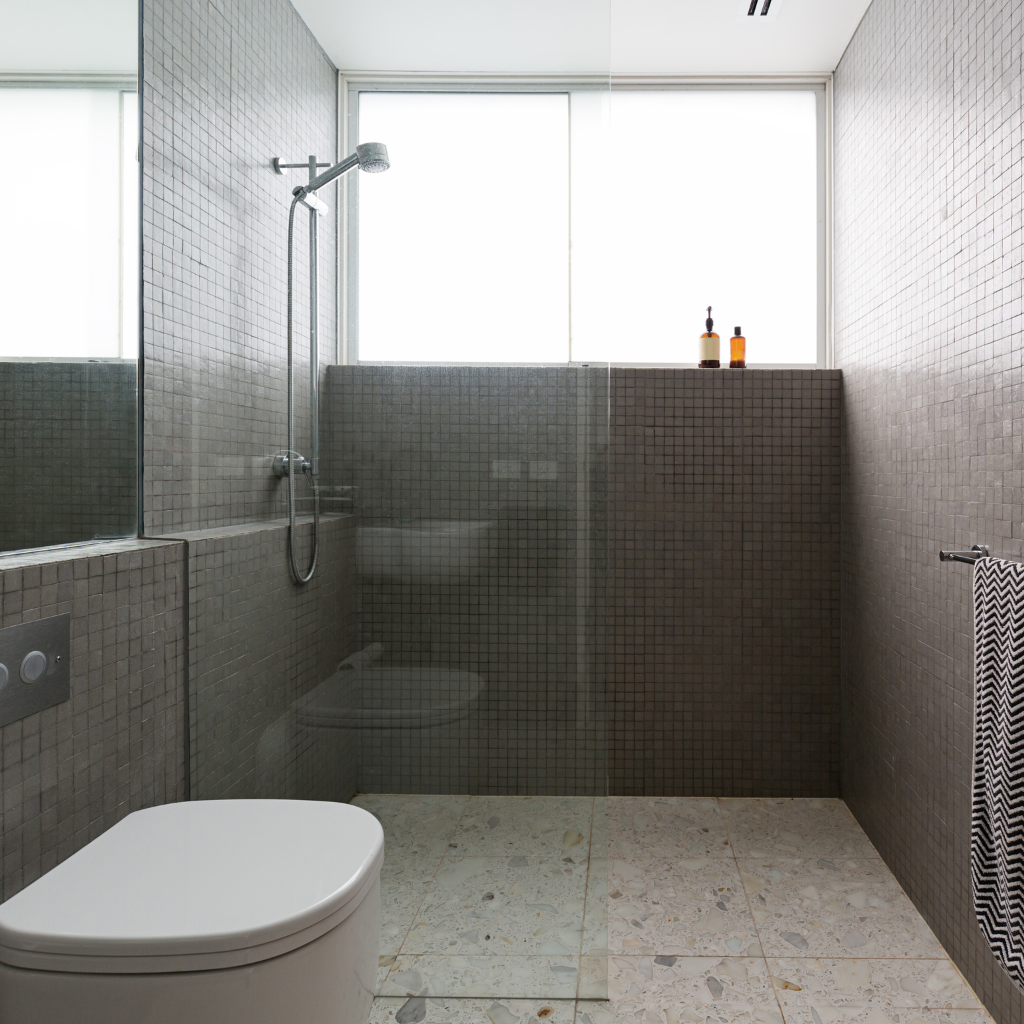
Fresh walk-in shower ideas can seamlessly elevate your bathroom’s comfort and aesthetics. Choose frameless glass doors to achieve a sleek, modern look, or bring in natural light with strategically placed skylights. For flooring, slip-resistant hexagon tiles offer both safety and style, while a dual showerhead adds a touch of luxury and convenience. To maximize the impact of these features, explore various layouts and materials that align with your personal style and budget.
Key Takeaways:
Install frameless glass doors to create a modern, spacious feel in your walk-in shower. The transparent Design allows the room to flow seamlessly, making even a larger bathroom feel more open and airy.
Add a rain showerhead to bring a calming, spa-inspired feel to your bathroom. Its soft, cascading water transforms your everyday shower into a relaxing and indulgent experience.
Use subway tiles for a timeless, versatile backdrop that complements any decor. This classic Design perfectly fits contemporary and traditional bathroom styles, creating a clean and sophisticated look.
Opt for slip-resistant floor tiles like hexagon or textured options for safety and style. These options help prevent accidents and offer visual interest and texture to the shower area.
Additionally, when choosing materials, it is important to be mindful of water damage. Consider using water-resistant products like sealants and high-quality grout to protect the walls and floor, especially in areas of moisture accumulation.
Integrate natural light through skylights or frosted windows to enhance the ambiance. This will brighten the room and make it more open, while the frosted glass ensures privacy.
What Are the Best Bathroom Design Ideas for a Walk-In Shower?
To elevate a modern bathroom walk-in shower, integrating natural light can transform the space, infusing it with warmth and a sense of openness.
Selecting floor tiles is essential; choosing slip-resistant and aesthetically pleasing options guarantees safety without compromising style.
Incorporating subway tiles adds a timeless touch that complements both modern and traditional decor, while offering lasting durability and visual charm.
How to Incorporate Natural Light into Your Walk-In Shower?
Integrating natural light enhances the aesthetic appeal and promotes a sense of openness and tranquility, making the room feel brighter and more inviting. Opt for a glass shower door or full glass enclosure, stretching from floor to ceiling, to invite sunlight into the space, adding a modern feel to your bathroom.
This design choice maximizes light penetration while maintaining privacy when using frosted or textured glass. The neutral colors in the bathroom will help keep the focal point on the sleek glass elements. Additionally, positioning the shower near a natural light source, such as a skylight or adjacent to frosted windows, can completely transform the ambiance, bringing a sense of warmth and openness.
Incorporating clear glass doors and panels as part of your walk-in shower ideas guarantees that every shower feels airy and illuminated, creating a serene and inviting bathroom environment. If you prefer a clean, crisp look, light colors like white and blue work perfectly with the transparency of glass. In contrast, black and white tones can add a stylish touch to the minimalist Design.
For those who want easy access, a raised step or a slight elevation in the shower area can create visual interest while maintaining accessibility for all. Different colors or shades on the other side of the shower, such as adding a pop of green to your tiles or vanity, can create a dynamic contrast and enhance the space.
For example, using color to accentuate certain features, like the vanity or the shower frame, can add personality without compromising the Design’s clean lines. This great choice allows for the perfect balance of style and function. Integrating a bathroom-remodeled walk-in shower with clear glass and enclosed spaces ensures the layout feels open yet organized, providing continuity between the shower and other elements.
A frame around the shower or using shades of tiles that match your overall bathroom theme can bring a sense of flow throughout. Whether you opt for blue accents or a more natural green, this design concept can completely transform your bathroom, making it feel fresh, bright, and light.
Choosing the Right Floor Tile for Your Walk-In Shower
Choosing the right floor tile for your walk-in shower is essential to achieving a bathroom that is both stylish and practical. The choice of floor tile not only defines the aesthetic of the shower but also guarantees safety and durability. Hexagon tiles, for instance, offer a contemporary edge while providing ample grip underfoot, making them a superb choice for shower floors. When planning a shower remodel, consider how the floor tile will harmonize with the walls and flooring of the entire bathroom.
Tile Type
Benefits
Hexagon Tiles
Aesthetic appeal, anti-slip surface
Porcelain Tiles
Water resistance, durability
Mosaic Tiles
Customizable patterns, enhances small spaces
Slate Tiles
Natural look, unique texture
Marble Tiles
Luxurious feel, distinctive patterns
This selection can elevate a small walk-in shower, setting it apart from the rest with both style and practicality.
Integrating Subway Tile for a Timeless Look
After exploring the functional and aesthetic merits of various floor tiles for walk-in showers, another key element in bathroom design comes into play: using subway tile to achieve a timeless ambiance.
Subway tiles offer a timeless style that effortlessly complements both modern and traditional decor, making them a versatile option for any bathroom renovation.
Classic Appeal: White subway tiles add a clean, crisp look that enhances the sense of space in a small bathroom.
Versatility: Easily pairs with various decor styles, from rustic to ultra-modern.
Durability: Ceramic subway tiles are known for their longevity and ease of maintenance.
Visual Interest: Laying tiles in unique patterns like herringbone or vertical stack can elevate the overall Design, injecting personality into a neutral-toned walk-in shower.
How to Plan a Small Bathroom Remodel Walk-In Shower?
In planning a small bathroom remodel for a walk-in shower, thoughtful consideration of space maximization becomes paramount. Bathroom remodel walk-in shower ideas are essential for ensuring the area remains functional and aesthetically pleasing.
Efficient layout ideas enhance functionality and guarantee the area remains visually appealing, especially when using clever shower ideas for small spaces. A corner walk-in shower is a great space-saving solution that also provides a luxurious and comfortable bathing experience.
Monochrome small bathroom ideas create an elegant, cohesive look that makes the space feel larger. Using an accent wall with a striking color or texture captures attention and adds visual appeal, making the space feel more lively and engaging.
For vintage small bathroom layouts, using retro-inspired tiles or fixtures paired with modern, sleek designs ensures a beautiful balance of old and new. Whether you’re looking for showers for small bathrooms or a compact bathroom layout, maximizing corner space is always a great way to save space and create an efficient design.
Incorporating a walk-in shower feel can help elongate the space and give it a spaciousness, which is especially important for a small bathroom feel. Combining minimalism with uncluttered surfaces helps promote a sense of calm and simplicity. Adding elements like a floating vanity or clear glass panels further contributes to the open and airy vibe, making the room feel larger than it is.
For homeowners with limited mobility, consider features like low thresholds or benches to ensure the shower is accessible and comfortable. Whether designing for style, function, or accessibility, these thoughtful features guarantee lasting results.
As time passes, this layout continues to provide an elegant, practical space that suits daily needs and aesthetic preferences. By enlisting the help of an expert, you can ensure every aspect of your remodel is in order, leading to results that will stand the test of time.
Maximizing Space in a Small Walk-In Shower
How does one maximize space in a small walk-in shower during a bathroom remodel? The challenge in compact spaces demands clever design strategies to make the area functional and visually appealing.
Here are key methods to enhance the perception and utility of a small walk-in shower:
Install a glass partition or shower screen to create an open, airy feel while containing water effectively, aiding in the illusion of a larger space.
Opt for doorless walk-in showers, eliminating the need for swing space and maintaining a sleek, uninterrupted look.
Use a clear or minimalist shower curtain as an alternative to glass to visually expand the area without solid barriers.
Employ reflective surfaces and strategic lighting to brighten the shower and expand the visual effect.
How Can You Create Efficient Layout Ideas for Small Bathrooms?
When remodeling a small bathroom to include a walk-in shower, careful layout planning is essential for maximizing functionality and style. Utilizing corner showers and doorless designs can make the bathroom feel larger while optimizing the available space. By strategically selecting the location of the shower, you can use the narrow areas of the room efficiently, making every inch count.
A glass shower panel instead of a full door enhances this effect, promoting a more open and airy environment. This minimal design choice helps eliminate visual clutter and creates the illusion of more space. However, it’s important to consider slippery surfaces in the shower, so opting for slabs or textured tiles for flooring can improve traction and safety.
In addition to the shower, consider adding an accent wall with bold tiles or colors to create a focal point, enhancing the overall Design without overwhelming the space. For a cohesive look, keep design elements within the boundaries of your space to avoid overcrowding.
Incorporating niches into the shower or the bathroom layout can provide convenient storage for toiletries and essentials while keeping the space organized. With careful planning, you can outfit the bathroom with thoughtful design elements that maximize storage and functionality.
For those considering a bathroom remodel from tub to walk-in shower, this layout transformation is a great way to utilize the available space more effectively, turning your bathroom into a sleek, modern retreat.
Feature
Benefit
Considerations
Corner Shower
Maximizes space
May limit shower size
Built-in Bench
Adds functionality
Increases shower installation cost
Glass Panel
Expands visual space
Requires regular cleaning
Doorless Design
Enhances accessibility
Potential for water spillage
Strategic Layout
Optimizes movement and functionality
Must be planned with precision
Employing these elements helps work effectively with a small space, ensuring the walk-in shower layout with a glass shower door is stylish and practical.
What Types of Showers Are Ideal for a Walk-In Remodel?
When considering a walk-in shower remodel, the variety of available shower types—from sleek, frameless panels to luxurious, full-enclosure rain showers—offers tailored solutions for any aesthetic and functional demand.
Installing a rain shower, for instance, can elevate the space into a spa-like sanctuary, blending comfort with the chic appeal of modern design trends. The statement rain shower becomes the focal point, maximizing the bathroom’s functionality and visual appeal. It creates an atmosphere of relaxation while seamlessly fitting into a modern, stylish space.
When planning a remodel, it’s important to consider how the design ties into the bathroom’s overall look. For example, incorporating soft pastels or bigger tiles can help the space feel more open and airy. Taking the layout and space into consideration ensures that the Design looks good and works well with the rest of the bathroom’s elements.
A walk-in shower remodel can also include smart features like built-in shelving for towels, which can be tucked neatly into the walls, saving valuable space. The inspiration for such storage solutions might come from minimalist designs or sleek cabinetry, which keeps the room organized and clutter-free.
Whether you’re looking for a bathroom, remodel ideas with a walk-in shower, or you’re inspired to create a modern, spa-like retreat, thoughtful design elements can turn any bathroom into an oasis that blends practicality and beauty.
Exploring Different Types of Shower Options
While considering a bathroom remodel, selecting the right type of shower for a walk-in design is essential to blend functionality with aesthetic appeal. Here are some ideal options:
Frameless Glass Doors: These doors provide a sleek, modern aesthetic that can instantly make any bathroom feel more open. They’re ideal for highlighting elegant walk-in shower designs.
Tile Enclosures: A tiled shower wall opens up endless design possibilities and can be customized to match any style, ensuring your new walk-in shower beautifully complements the entire bathroom decor.
Dual Showerheads: Installing dual showerheads can enhance the functionality of a spacious walk-in shower, allowing for a more luxurious and efficient bathing experience.
Barrier-Free Showers: Ideal for accessibility, these showers eliminate the need for a step, making them a smart choice for a remodeled bathroom walk-in shower project.
Benefits of Installing a Rain Shower
Integrating a rain shower into a walk-in remodel elevates the bathroom’s visual appeal and transforms the bathing experience into one of indulgence and relaxation.
Opting for a rain shower in your walk-in shower design promotes a seamless flow from the daily rush to a spa-like experience. The gentle descent of water mimics a natural rainfall, encouraging tranquility and offering a sensory retreat. With a premium rain shower head, you can enjoy a warm, soothing shower that feels luxurious whenever you step inside.
Including a shower bench adjacent to the rain shower enhances comfort, providing a space to sit and unwind or enjoy a steamy soak without the need for a soaking tub. The bench can be designed with durable wood or a sleek, recessed style, depending on your aesthetic preferences, adding both functionality and glamorous appeal to the space.
Strategically placing the rain shower near a window or incorporating natural light can transform the area into a luminous sanctuary. This enhances the visual appeal and makes the space feel larger, bringing an extra touch of nature’s inspiration into your bathroom.
To ensure practicality and efficiency, it’s essential to calculate the height of the showerhead based on your personal preferences or the common height in your home. This simple adjustment can improve comfort and the overall showering experience. Additionally, using recessed lighting or wall-mounted fixtures in the shower ensures the space remains visually open and uncluttered, maximizing bathroom remodel ideas for walk-in showers.
The rain shower also provides an easy way to replace traditional shower heads, offering more than just function but also a sense of indulgence. With the ability to splash water in a delicate, controlled manner, you get the best of both worlds—luxury and practicality.
Lastly, a rain shower is a great way to enter your shower space, where every detail is meticulously planned to offer a glamorous, functional environment that suits your style and needs. Whether it’s an update or a complete bathroom remodel walk-in shower, integrating a rain shower is an elegant and indulgent solution.
How is the Walk-In Shower Installation Process Done?
After exploring the benefits of incorporating a rain shower into your walk-in remodel, it’s important to understand the installation process and identify which types of showers best complement this modern setup.
Frameless Glass Enclosures: Elevate walk-in shower aesthetics with sleek, frameless walk-in shower doors, enhancing the open feel and showcasing chic tile work. This clean, minimalist design helps maximise space, making the shower area feel larger and more connected to the rest of the bathroom.
Low-Threshold Options: Ideal for accessibility, these options minimize walk-in shower cost concerns related to extensive renovation work while offering a seamless passage. They are a smart solution for creating a comfortable, accessible shower without compromising on style.
Multi-functional Panels: Integrate features that make your walk-in shower stand out, like body jets or steam functions, blending luxury with practicality. These additions not only elevate the shower experience but also enhance the bathroom’s overall functionality, adding an element of indulgence and modernity.
Contrasting Textures: Use materials that contrast traditional shower tiles to give your new shower a unique, trend-aware edge. For instance, pair white tiles with textured or patterned tiles to create a feature wall that draws the eye and adds depth to the space. The juxtaposition of neutral colours with light colours like soft greys or beiges will create a soothing, balanced atmosphere while maintaining a classic style.
By carefully selecting these design elements, you can build a walk-in shower that reflects your personal style while staying on trend, offering both practicality and a touch of luxury.
How to Choose the Right Shower Tile and Accessories?
Choosing the right wall tiles and materials for your walk-in shower walls is essential for durability and style.
Opting for natural stone can add a touch of luxury and timeless appeal, enhancing the overall aesthetic of your bathroom.
Additionally, selecting modern fixtures complements the Design and incorporates the latest functional technology for a more enjoyable shower experience.
Selecting Shower Wall Materials for Durability
Selecting the right materials for shower walls not only frequently dictates the aesthetics but also the longevity of a bathroom remodel.
When designing a spacious walk-in shower, choosing shower wall materials is pivotal. Here are some considerations:
Neutral Marble Tiles: Offer a timeless elegance and can create a luxurious feel within any spacious walk-in shower, enhancing the overall interior Design.
Glossy Tiles: These are ideal for adding a modern touch and reflecting light, making the space appear larger.
Zellige Tile: Known for its unique imperfections and texture, it adds character and an artisanal quality to the shower area.
Tile Patterns: Experimenting with different tile patterns can personalize the space and complement the aesthetic focus of the bathroom.
Incorporating Natural Stone for a Luxurious Feel
Incorporating natural stone into a walk-in shower design elevates the space with luxury and timelessness. For those refurbishing a primary bathroom, natural stone like white marble or terrazzo adds a luxurious feel, blending perfectly with the latest design trends and the aesthetic of a large functional space.
White marble, renowned for its clean lines and sophisticated appearance, introduces an element of architectural interest and is frequently highlighted in ‘Elle Decor’ for its elegance and durability. The polished finish can also create a mirroring effect, enhancing the feeling of openness in the bathroom, especially when paired with large format tiles on the walls and floors. This design choice makes the space feel bigger and more cohesive.
Meanwhile, terrazzo offers versatility through its colorful speckled patterns, providing durability and style. It can create bold accents in the shower or bathroom, adding a unique touch while maintaining a classic appeal.
When designing a walk-in shower, choosing natural stone guarantees functional longevity and high style, making the bathroom a utility space and a personal sanctuary. Additionally, consider leaving elements like the toilet or sink open for a bathroom remodel walk-in shower or using black metal accents for a modern twist. This also allows for better storage options, whether built into the walls or under the vanity, keeping the space organized and sleek.
If mobility issues exist, opting for shapes that reduce the need for steps or adding large format tiles can create a more accessible, functional space. Ensuring the layout minimizes sharp edges or uneven flooring will also help prevent tripping, making the bathroom more comfortable and safe.
Modern Fixtures to Enhance Your Walk-In Shower
Several modern fixtures can dramatically transform a walk-in shower’s functionality and aesthetic appeal.
Focusing on the synergy between style and practicality is vital in curating an eclectic bathroom space. With the right choices, you can maximize space while ensuring comfort and luxury.
Here are some top picks:
Dual Shower Heads: Equip the wet room with rainfall and handheld shower heads, catering to indulgent soaks and efficient rinses. This is particularly beneficial in a large walk-in shower, where having two types of shower heads allows you to customize your experience.
Thermostatic Mixer Taps: These guarantee a consistent hot and cold water balance, providing comfort without fuss. Perfect for those who enjoy a tranquil and relaxing shower experience, they also prevent sudden temperature changes for a smooth shower flow.
Gold Hardware: Introduce gold hardware for a touch of luxury. This pairs beautifully with both industrial elements and a freestanding tub. Gold accents can complement a feature or angled wall, adding sophistication without overwhelming the space.
LED Shower Panels: Modernize with LED panels that offer therapeutic colored lighting options, enhancing both mood and Design. They can transform your shower space into a steam room experience with a soft, calming glow, perfect for unwinding after a long day.
Consider incorporating a clear shower screen or frosted glass partitions to open up the space visually when designing your walk-in shower. This can make a compact bathroom feel much larger, even when you’re dealing with limited floor space. For those who want to feel more open without taking up too much room, these elements create the illusion of more space while maintaining privacy.
Consider integrating shelves or drawers into the shower design to maximize space further. These can store toiletries or other essentials, keeping the area tidy and organized. In smaller layouts, consider using corner space to fit shelves or shower caddies that save space while offering convenient storage options.
Prioritize a design that blends form and function in your bathroom remodel with a walk-in shower. Whether you choose space-saving elements like a combined tub or cleverly utilize angled walls to expand the shower area, make sure every inch is purposeful and efficient.
What Is the Walk-In Shower Cost and Budgeting Tips?
Shifting into the financial aspects of adding a walk-in shower, understanding the cost dynamics is essential for a well-budgeted remodel.
Estimating the installation expenses involves considering materials and labor while weighing the influence of current design trends and technological advancements. For instance, opting for a corner walk-in shower can significantly reduce costs, as it utilizes unused areas of your bathroom more efficiently, helping to make the space feel larger without requiring a complete overhaul.
If you’re considering a more luxurious setup, features like exposed pipes, wooden textures, or a glossy finish for the tiles can add high-end appeal. These elements can elevate the overall aesthetic without pushing your budget too far. However, be mindful of additional grout lines, which require extra cleaning and maintenance, potentially adding to long-term costs.
Installing a shower with a glass enclosure is an excellent option for those looking to create a bigger room effect. A glass enclosure makes the room feel more space-efficient by minimizing visual barriers. This creates the illusion of a bigger room while maintaining functionality. Alternatively, using three walls for the shower design helps open up the bathroom while still providing privacy.
When considering the materials, grey tones can be a good choice for creating a modern, neutral palette with various bathroom styles. Additionally, incorporating elements of nature, such as stone or wood finishes, brings a sense of calm and style that’s both fashion-forward and timeless.
In terms of flexibility, mixing different materials—such as pairing wooden textures with exposed pipes—can create a creative, affordable solution. By balancing aesthetics with functionality, it’s possible to achieve a shower enclosure that’s not only cost-effective but also stylish and unique.
For a more budget-friendly remodel, exploring a range of market options—like affordable tiles that still offer a luxurious look and feel—can make a big difference. Partnering with a professional helps ensure the project stays within budget while maintaining high-quality results, so you can enjoy your new walk-in shower without compromising on style or craftsmanship.
The desire to get a walk-in shower, seamlessly built in and level with the floor, requires a detailed approach, especially when using a primary bath with limited space.
Here are some cost estimates to evaluate:
Base Materials: Tiles, glass panels, and drainage systems can start from $600.
Labor Costs: Installation labor varies, but expect to pay between $500 to $1500.
Additional Features: Upgrades like rain showerheads or digital controls may add $200 to $1000.
Total Estimate: Overall costs typically range from $1,200 to $3,100 for a standard main bathroom.
These figures help in budgeting for a stylish and functional bathroom upgrade.
Cost-Effective Bathroom Remodel Strategies
Incorporating a walk-in shower into a bathroom remodel can dramatically enhance functionality and style, yet it demands careful budget management.
Opting for an alcove shower can be smart, as it typically utilizes less square footage while maximizing the entire space.
Using the same tiles for the shower and the bathroom floor can create a seamless look that makes the bathroom feel larger and more elegant.
Choosing a simple white bathroom palette for tiles and wall paint can brighten the space and reduce costs without sacrificing style.
This approach guarantees a cohesive aesthetic while managing expenses effectively, allowing homeowners to achieve a luxurious feel without breaking the bank.
Factors Influencing New Walk-In Shower Costs
Understanding the costs of installing a new walk-in shower for a seamless transition is fundamental for homeowners planning a bathroom upgrade. Here are key factors:
Design Complexity: Choosing a design incorporating a sloped ceiling or covering more than one wall can greatly influence costs.
Materials Used: High-end materials suited for traditional or contemporary master baths can vary widely in price.
Size and Scope: Expanding the shower to create the illusion of a larger rest of the bathroom may require more extensive construction.
Additional Features: Incorporating elements like multiple showerheads or bespoke glass panels to harmonize with the rest of your bathroom enhances aesthetic appeal and adds to the budget.
These variables must be carefully considered to align with style and financial plans.
Conclusion
Remodeling your bathroom with a walk-in shower brings together style and functionality. Selecting the right design, tiles, and accessories not only boosts visual appeal but also reflects current trends. Smart planning—especially for smaller spaces—and a well-managed budget ensure a smooth blend of elegance and practicality. In the end, a thoughtfully designed walk-in shower enhances your home’s value and comfort, turning everyday routines into a spa-like retreat.
Innovative loft conversion stairs ideas blend style with functionality, transforming any loft conversion. Alternating tread staircases and sleek spiral designs save space while adding a sculptural aesthetic. Incorporating materials like glass or acrylic not only enhances natural light flow but also serves the dual purpose of style and spaciousness. Safety features, including anti-slip surfaces and visually contrasting treads, guarantee practicality and meet modern design standards. Exploring further will reveal additional designs tailored uniquely to loft spaces.
Key Takeaways
Consider alternating tread stairs for a compact and efficient ascent in tight loft spaces.
Install a spiral staircase to serve as a stunning visual centerpiece while maximizing floor area.
Use open risers and glass or acrylic steps to enhance natural light flow and visual spaciousness.
When deciding where to put stairs for a loft conversion, make sure the design is in line with the overall layout.
Ensure staircase designs comply with building regulations for safety, including adequate headroom and stair width.
Integrate anti-slip materials and high-contrast edges on treads for enhanced safety and accessibility.
What Are the Best Ideas for Loft Stairs in Small Spaces?
In the domain of small loft conversions, implementing space-saving stair solutions merges functionality with aesthetic grace.
Designers often recommend slender, vertical staircases or spiral stairs and alternating tread stairs to maximize floor area without compromising access.
To enhance the illusion of spaciousness, the strategic placement of skylights or clear panels can flood the ascent with natural light, expanding the visual depth of the area.
How Can Space-Saving Loft Conversion Stairs Be Implemented
Maximizing the utility of limited space, architects and designers often recommend innovative space-saving stairs solutions that blend functionality with aesthetic appeal.
Space-saving loft conversion stairs, such as alternating tread stairs or paddle staircases, are ideal for compact spaces. These designs allow for steep, efficient ascents without occupying the extensive footprint of a new loft stair case or traditional staircases. Loft ladder options and open riser stairs further support the need to maximize vertical space and enhance the range of motion within two levels.
Spiral stairs, with their vertical configuration, also serve as a visually striking yet practical choice within small-scale environments. Each option not only optimizes the area but also enhances the loft’s overall design, integrating seamlessly into the aesthetic.
What Is the Ideal Loft Stair Design for Limited Areas
While selecting the ideal loft stair design for limited areas, one must consider both form and function to guarantee the space is utilized efficiently.
Spiral staircases, a quintessential space-saving loft solution, curve gracefully in tight spaces, combining elegance with practicality. For even more compact areas, alternating tread or paddle stairs are innovative loft stairs designs that maximize every square inch.
These designs allow for steeper ascents without the footprint of traditional stairs, integrating seamlessly into a loft conversion. A small landing can also be strategically incorporated, enhancing safety without compromising on space.
Designing staircase ideas for a loft conversion in such environments demands creativity to blend aesthetic appeal with essential functionality, ensuring the stairway complements the overall spatial design. Storage can also be creatively designed beneath stairs to maximize space. Spindles and railings add decorative value, whilst offering safety.
How to Maximize Natural Light in Loft Spaces
Having considered the spatial constraints for loft stair designs, attention now turns to optimizing the infusion of natural light within loft spaces, a key element in enhancing the ambiance and perceived spaciousness.
In loft conversions, the strategic placement of a loft staircase can dramatically affect natural light distribution, and loft conversion stairs regulations must be adhered to. Selecting a staircase design with open riser stairs and slender, unobtrusive balustrades maximizes light penetration, creating an airy, luminous environment.
Additionally, incorporating glass or acrylic steps in loft stairs or fixed ladder stairs can further enhance light flow, reflecting and dispersing sunlight throughout the loft space.
Thoughtful consideration of materials and placement not only optimizes the aesthetic value but also contributes to a space-saving, cost-effective loft conversion, making the most out of every square inch and ray of light. This approach gives a sense of openness and creativity, adding a modern touch.
How to Ensure Your Loft Staircase Complies with Building Regulations?
Maneuvering the intricate maze of building regulations for loft conversions guarantees that your staircase is not only visually appealing but also legally compliant.
From adhering to strict fire safety standards to optimizing limited vertical spaces for sufficient headroom, each element of the staircase design plays an essential role. A proper climb between two levels should have equal tread spacing and meet necessary safety standards.
These regulations form a blueprint that marries safety with aesthetics, guiding homeowners to achieve both functional and charming loft staircases.
What Are the Key Building Regulations for Loft Conversions
Understanding the labyrinth of building regulations is essential when converting a loft and installing a staircase, ensuring safety, functionality, and legal compliance.
When designing loft conversion stairs, one must navigate a complex array of requirements that dictate everything from the staircase’s width to its headroom. To comply with building regulations, new loft stairs must not only be structurally sound but also designed to integrate seamlessly into the existing architectural fabric.
This includes adhering to the stairs in loft conversion regulations that specify minimum dimensions and escape routes. Furthermore, the placement of a new loft staircase often requires careful consideration of fire-protected zones, ensuring that the stairs comply without compromising the safety or aesthetic integrity of the home. Storage areas can also be placed under the staircase to enhance functionality.
Each detail, from tread depth to landing areas, must align with these stringent standards. Highlighting key regulations with a clear order ensures clients understand the requirements and allows them to apply for planning in a structured way.
How to Meet Fire Safety Standards for Loft Stairs
To guarantee loft stairs comply with fire safety standards and building regs, meticulous planning and design are paramount. Confirming compliance with building regulations for loft stairs not only enhances safety but also elevates the aesthetic charm of the space.
Here are key considerations:
Fire Resistance Material: Use materials that offer enhanced fire resistance for both the stairs and the surrounding structures. This guarantees a safer passage in case of fire.
Installation of Suitable Fire Doors: Position a suitable fire door at the top and possibly at the bottom of the stairs to compartmentalize and delay the spread of fire to and from the loft.
Integration with Existing Staircase: If the loft stairs integrate with an existing staircase, confirm that the entire path maintains continuous fire safety features, as stipulated by building control, to safeguard all habitable rooms connected by the stairs.
Designing the Perfect Loft Staircase Ideas UK: Colour, Lighting, and Layout Tips
Painted finishes in black or grey, or accents in white, can help decorate and visually frame the staircase. Clients often ask questions about colour schemes and the best ways to decorate the space around the stairs. The creative placement of lighting and use of natural tones enhances the visual impact and sets the tone for the entire loft. A drop in ceiling height or the placement of furniture may influence the layout and reach of the stairs.
The experience of working with a professional team helps identify the right place for your staircase, taking into account both structure and aesthetics. Feel free to contact our team for more information or to review examples of previous installations. Generally, the means to create an efficient and attractive loft staircase are available—you just need the right guidance to get started.
What Is Required for Sufficient Headroom in Loft Stairs
Guaranteeing sufficient headroom in loft stairs is vital for compliance with building regulations, which stipulate a minimum clear headspace to prevent injury and enhance comfort. When planning a loft conversion, understanding these requirements is essential to creating a safe and functional staircase solution. UK building regulations specifically dictate the necessary ceiling height and minimum width to facilitate ease of movement and safety.
Feature
Requirement
Importance
Minimum Headroom
2 meters
Avoids head injuries
Stair Width
600 mm
Guarantees accessibility
Ceiling Height
Consistent with headroom
Maximizes space efficiency
Designing a new staircase or modifying a traditional staircase must align with these standards to guarantee both aesthetic appeal and regulatory compliance.
What Are the Cost Considerations for Loft Conversion Stairs?
Beginning the creation of loft stairs not only transforms space but also involves careful financial consideration.
The cost of a loft conversion staircase can vary widely, influenced by choices in materials, design intricacies, and the unique structural requirements of the home. How much space do you need for loft stairs? This depends on the type of staircase you choose. For example, alternating tread stairs typically require less space compared to traditional staircases, while a spiral staircase can fit into tighter corners and still provide ample functionality.
These factors intertwine to craft both the final aesthetic and the project’s budget, guiding homeowners through a pivotal decision-making process.
How Much Does a Loft Conversion Staircase Typically Cost
The cost can vary widely based on several factors, but here are the key considerations:
Type of Loft Conversion: A new loft conversion might require a bespoke loft staircase that is creatively designed to meet building regulations and match the existing aesthetic of the home.
Stair Design and Materials: The choice of materials and the complexity of the stair design can greatly influence the cost. Luxurious materials or intricate designs will increase the investment.
Compliance and Permissions: Ensuring that the new staircase adheres to full planning permission requirements and seamlessly integrates with existing stairs can also affect the overall cost.
What Factors Affect the Loft Conversion Stairs Cost
Building on the initial cost overview, it becomes evident that several nuanced factors, including existing flight, intricately shape the financial landscape of installing loft conversion stairs. The type of loft and existing house architecture heavily influence the cost of loft conversion stairs.
Tailored design ideas, whether traditional or modern, must harmonize with the home’s aesthetic while adhering to regulations for loft conversions. A structural engineer might be necessary to guarantee the design maximizes space in your home efficiently and safely, potentially elevating costs.
Furthermore, innovative solutions designed to save space, such as spiral staircases or alternating tread stairs, can vary in price. Ultimately, each conversion project presents unique challenges and opportunities, making a personalized approach essential in cost estimation and design implementation.
How to Choose the Right Staircase Design for Your Loft?
Selecting the ideal attic stairs for a loft involves balancing aesthetics with functionality. Alternating tread stairs offer a compact, space-efficient solution, whereas a spiral staircase can introduce a sculptural, flowing element to the centre of the space. Other attic conversion stairs ideas include folding stairs for a more flexible and space-saving option, or traditional wooden stairs if you’re aiming for a more classic, cozy feel.
For those inclined towards a seamless blend of old and new, traditional features can be elegantly integrated into modern lofts. A permanent staircase maintains utility while enhancing the interior design, ensuring there’s enough headroom and compliance with full planning permission where needed.
What Are the Advantage of Alternating Tread Stairs
While traditional staircases consume substantial floor space, alternating tread stairs offer a practical solution for a new loft conversion, maximizing utility in confined areas. Other loft conversion staircase solutions include spiral staircases, which are ideal for saving space while adding a striking visual element, or open riser stairs to create a sense of lightness and openness.
These stairs are specifically constructed with alternating steps, reducing their footprint, making them ideal for traditional homes with limited space.
Space Efficiency: They save more space, which is ideal for layouts that need to suit tight quarters or unusual angle configurations.
Safety and Accessibility: With ample gaps for foot placement, they are safer than a ladder, though a last resort in particularly tight areas.
Aesthetic Appeal: A popular choice for lofts where every section of the home needs to pop with modern design.
When Is a Spiral Staircase a Good Option
When considering the addition of a staircase to a loft, why might a spiral design or paddle staircase emerge as the superior choice? A spiral staircase is often deemed ideal for loft conversions due to its compact footprint.
In the context of loft conversion design, where space is a premium, the spiral staircase’s vertical ascent maximizes floor area while adhering to fire regulations, leaving more room for other uses. This space-saving feature makes it particularly suitable for small rooms or situations where maintaining an open feel is essential. It can be a feasible design even when full planning permission is required. The inclusion of a small landing further enhances the space-saving loft conversion stairs, ensuring ease of access while minimizing the impact on the overall layout of the space.
Moreover, the aesthetic of spiral staircases can enhance domestic stairs by adding a sculptural element that acts both as functional loft access and a visual centerpiece. It’s an example of how function meets design.
Essentially, spiral staircases blend elegance with practicality, making them innovative loft stairs spiral for those adding a loft.
How to Integrate Traditional Stairs in a Modern Loft
Integrating traditional staircases into modern lofts can transform an ordinary space into a striking blend of old and new. Traditional stairs, particularly those crafted from wood, can add warmth and classic charm to the sleek lines of a modern loft.
Select the Right Style: Opt for a simple staircase design, like a straight staircase, if there’s enough room. This creates a seamless shift without overwhelming the living space and preserves traditional features.
Material Matters: Utilize wooden stairs to introduce a tactile, natural element that contrasts beautifully with contemporary materials like steel or glass. Timber works well here.
Customize and Complement: Consider the bespoke staircase solutions that are available. A new stair can be designed to echo architectural details from the loft for a cohesive aesthetic. It can suit the construction and layout.
What Are the Best Materials for Loft Stairs?
Selecting the ideal material for loft stairs merges both aesthetic charm and functional durability.
Considering wooden stairs, one must discern the most suitable wood type, weighing factors like grain texture and hardness.
Meanwhile, exploring metal options reveals a spectrum of strengths and weaknesses, from sleek industrial appeal to potential acoustic concerns. Always review what suits your needs.
How to Select the Right Wood for Wooden Stairs
Choosing the perfect wood for loft stairs involves both an appreciation for aesthetic nuance and a commitment to structural integrity.
When selecting wood for loft stairs, which are often a central feature in loft conversions, important considerations emerge:
Durability: Opt for hardwoods such as oak or maple that can endure the wear and tear along the entire length of the stairs. These woods are ideal for high-traffic areas, like the set of stairs leading to a single habitable room.
Aesthetics: Choose a wood that complements the interior design. For an L-shaped or straight flight with a half landing, rich-grained wood can enhance the visual flow. Consider matching colours with existing furniture.
Functionality: For retractable ladders or fixed loft ladder stairs, lighter woods or those that integrate well with mechanisms are preferable. This helps with folding designs, where a hatch is involved.
How to Enhance Safety and Accessibility in Loft Staircases?
Enhancing the safety and accessibility of staircases for the loft begins with meticulous attention to handrail installation, ensuring they are both sturdy and ergonomically designed for all users.
The choice of treads plays a critical role; selecting materials that provide ample grip can prevent slips and falls, making each step secure.
Thoughtful design elements, such as adequate tread depth and visual contrast, further promote safety without compromising the staircase’s aesthetic appeal.
What Are the Best Practices for Handrail Installation
In the domain of loft staircase design ideas, the installation of handrails is not merely regulatory compliance but an essential element that marries safety with aesthetics.
When considering the best practices for handrail installation, it is critical to focus on both functional and stylish aspects.
Height and Positioning: Install handrails at a consistent height that accommodates the average adult, typically around 34 to 38 inches above the stair nosings. This guarantees a comfortable grip and enhances balance.
Materials and Design: Choose materials that complement the loft’s interior while guaranteeing durability. Hardwoods, metals, or reinforced glass offer both elegance and resilience. Check what suits your wall colour and room layout.
Integration with Architecture: Seamlessly integrate handrails into the staircase design. Curved or geometric shapes can add a sculptural quality to the space, transforming a functional element into a focal point of the loft’s aesthetic.
Conclusion
Ultimately, choosing the perfect staircase for a loft conversion intertwines aesthetics, compliance, and functionality. Whether embracing compact spirals that whisper elegance or sturdy, minimalist designs that speak to modern simplicity, the materials and safety features selected carve out the character of the loft. Each step not only assures compliance and cost-efficiency but also crafts a pathway that enhances the loft’s charm and accessibility, making every ascent an integral part of the home’s unique story. Take time to research and contact the right team to get the job done. If you’ve decided on a staircase, note how it fits the layout and what impact it will have on furniture and rest areas. Alternatively, arrange a consultation and find out what options work best for you. Always think ahead—it’s a lot to consider, but the result is worth it.
Creating the perfect basement swimming pool for everyday swimming sessions requires carefully considering space, design, and functionality. Incorporate state-of-the-art ventilation and air handling systems into your basement swimming pool design to maintain a comfortable environment year-round. Additionally, features like swim treadmills for continuous training can be added to enhance the space’s functionality and appeal.
Opt for a basement swimming pool design that maximizes usability while adhering to essential structural and waterproofing requirements. This ensures the pool remains safe and functional for the long term. For those seeking to elevate their home’s luxury and utility further, exploring more detailed insights on basement swimming pool design can provide valuable guidance in achieving the perfect balance of form and function.
Key Takeaways
Ensure compliance with building regulations for safety and legal adherence.
Install advanced ventilation and dehumidification systems for optimal air quality and humidity control.
Incorporate a swimming treadmill for continuous swim training and fitness.
Use high-quality, durable materials for structural reinforcement and waterproofing.
Design the pool area with modern amenities like LED lighting and temperature controls for a comfortable swimming environment.
What Are the Benefits of Having a Basement Swimming Pool?
Integrating a swimming pool into a basement can greatly boost a property’s market value, offering a compelling feature that distinguishes it from others in the real estate market. Whether you opt for a single-floor design or a more expansive layout, a pool basement becomes a unique and highly desirable aspect of the home.
The advantage of an indoor pool, particularly in the basement, extends to providing entertainment and fitness opportunities regardless of weather conditions, ensuring endless usage throughout the year. With an underground swimming pool, you can enjoy the luxury of a private oasis indoors, eliminating the need for an outdoor pool that requires seasonal maintenance.
When deciding on the pool’s depth, it’s essential to consider how your family will use it—whether you prefer a shallower area for relaxation or a deeper section for more serious swimming. The layout and style of the pool can also be customized to match your home’s design and aesthetic, making it a true reflection of your taste.
Additionally, a luxury basement pool serves not only as a recreational area but also as a sophisticated architectural element that enhances the aesthetic and functional appeal of the home. Adding a patio or seating area around the pool can make the space more inviting. To make this dream a reality, it’s best to contact professionals who specialize in luxury pool designs and brand the space with elements that bring comfort and elegance.
With the right planning and design, a basement pool makes it easier to create a stylish, functional retreat that can become a standout feature of your property.
How Does a Basement Pool Enhance Home Value
Why should homeowners consider installing a basement swimming pool? A luxury basement swimming pool serves as a unique feature within a house and greatly enhances property value.
Here are the key reasons:
Increased Property Value: Homes with indoor swimming pools often attract higher market prices due to their appeal as a luxury amenity.
Unique Selling Point: When competing in a crowded market, a house with a well-designed indoor pool can stand out, especially if it complies with building regulations and planning permission.
Enhanced Usability of Space: Transforming an underutilized basement into a vibrant and functional area adds valuable, usable square footage, which can be a critical factor during property evaluation.
Can an Indoor Pool Provide Year-Round Enjoyment
Having discussed the impact of a basement swimming pool on property value, it is equally important to contemplate the personal benefits it provides to homeowners. A swimming pool basement offers the advantage of year-round swimming, irrespective of the weather conditions outside. This indoor setting guarantees that dehumidification and air handling systems create a comfortable pool environment, enhancing the indoor swimming experience.
With proper climate control and maintenance, a swimming pool basement becomes a private retreat that can be enjoyed anytime, adding luxury and convenience to your home.
Feature
Benefit
Dehumidification
Maintains humidity, prevents damage
Heating & Filtration
Guarantees warm, clean water
Swimming Treadmill
Allows for continuous swim training
These systems, integral to maintaining a swimming pool basement, guarantee that the water remains pristine and the space usable, thereby maximizing the investment in a basement pool.
What Makes a Luxury Basement Pool a Unique Feature
While a basement swimming pool is a significant home improvement, its transformation into a luxury feature elevates a property’s aesthetic appeal and functional value. Luxury basements with indoor swimming pools integrate state-of-the-art design and technology, offering exclusivity and comfort. For those who prioritize fitness or prefer a more structured swimming experience, a basement lap pool can be a perfect addition, providing a sleek and efficient space for exercise.
Moveable Floors: Adjust depth for safety or convert to a solid floor, maximizing space utility.
Advanced Lighting and Air Handling: Enhances ambience and guarantees a comfortable climate, managing humidity and temperature efficiently.
Water Table Management: Sophisticated systems maintain ideal water levels and quality, which are essential in underground swimming pool settings.
Such features underscore the luxury of having a basement pool and smartly navigate the challenges of basement pool cost and installation.
What Are the Key Considerations When Building a Pool in the Basement?
When planning a basement swimming pool, following building regulations is vital to guarantee safety and compliance. Firstly, excavating the space properly is crucial, as this will lay the foundation for your indoor basement swimming pools. Depending on local laws in your borough, securing planning permission can impact the project timeline and design. This step must ensure everything fits within legal guidelines and avoids future complications.
Once the planning phase is complete, you can assemble the perfect construction and installation team. Photos of past projects, such as those in high-end areas like Chelsea, can inspire and give you an idea of what’s possible regarding design and style. For homeowners interested in creating a space that enhances functionality and aesthetics, it’s important to seamlessly fit the pool into the overall design.
Additionally, sophisticated air handling solutions are essential to maintain air quality and manage humidity levels in a confined basement space. These systems help keep the environment pleasant and comfortable to enjoy your pool year-round.
To make the process faster, consider working with professionals with experience in creating these sophisticated indoor spaces. With the right approach, you’ll love the results, transforming your basement into a luxurious retreat with various features that fit your needs.
What Building Regulations Must Be Followed
Implementing a swimming pool in a basement involves adhering to numerous critical building regulations to maintain safety, functionality, and structural integrity.
When undertaking building and construction work for an indoor basement pool, several specific regulations must be followed:
Structural Reinforcement: Basement conversions involving excavation to dig out a basement require enhanced structural support for walls and the ceiling to handle the water’s weight and the soil pressure from the surrounding ground level.
Waterproofing: Effective waterproofing systems must be installed to prevent water ingress and protect the building’s foundation and structural elements, including the roof.
Ventilation Systems: Adequate ventilation must be designed to manage humidity levels and promote air quality, preventing moisture-related issues and ensuring a comfortable environment.
Is Planning Permission Required for a Basement Pool
When initiating the construction of a pool, particularly in regions like London, basement pool projects often necessitate planning permission, especially if the structure alters the building’s exterior or the use of the space beneath. If you’re asking, “Can I put a swimming pool in my basement?” the answer depends on several factors, including local council regulations and the scale of the project.
For a pool in a newly constructed basement or extensive basement extensions, adhering to local council rules and ensuring the design fits within architectural guidelines is vital. It’s essential to work closely with experts who understand these regulations and can guide you through the necessary steps for compliance. A well-coordinated team can help ensure all order and safety protocols are followed, making the process smoother.
Discover our range of contemporary pool designs that maximize the utility of new basements while enhancing the overall space. Whether you want to transform an existing area into an indoor spa pool or integrate a swimming pool into the cellar, our designs blend style and function.
Taking the time to understand the process and consult with professionals fully will ensure your pool installation adds value to your property and meets all necessary legal standards. Look for examples of successful projects and find inspiration for creating a luxurious and practical basement retreat. With the right approach, you can seamlessly integrate your swimming pool in the basement, providing a space that blends with the rest of your home.
How to Ensure Proper Air Handling in a Basement Pool
Securing the necessary planning permissions is the first step in adding a basement swimming pool to your home.
Guaranteeing a healthy swimming pool environment requires state-of-the-art air handling systems. Here are the key considerations:
Ventilation Technology: Implement advanced ventilation solutions that efficiently exchange indoor air with fresh outdoor air, minimizing chlorine odours and maintaining humidity.
Dehumidification Systems: Use robust dehumidifiers to control moisture and prevent condensation, protecting the basement structure and guaranteeing comfortable air quality.
Ozone Generators: Integrate ozone purification systems to reduce chlorine use and improve air quality, enhancing the overall swim experience in the basement swimming pool space.
Proper air handling guarantees the pool’s longevity and its users’ health.
What Are Some Pool Design Ideas for Indoor Basement Pools?
When designing an indoor basement pool, homeowners can enhance the spa-like ambience by integrating a steam room or sauna directly connected to the pool area. This combination creates a luxurious retreat within your home, offering both relaxation and fitness benefits.
Considering the latest trends in swimming pool design, such as infinity edges or LED lighting, can transform a simple house basement swimming pool into a modern escape. The addition of endless pools, which provide a current for continuous swimming, is also becoming increasingly popular for those seeking both function and elegance in a confined space.
Additionally, the choice between a lap pool and a natural swimming pool should be dictated by the available space and the homeowners’ fitness or aesthetic preferences. Ideas for swimming pools should be tailored to suit your home’s space and overall style. For example, if you have a long basement, a lap pool may be ideal for swimming exercises, while a natural pool might appeal to those looking for a more organic, eco-friendly vibe.
How to Incorporate a Steam Room or Sauna
Incorporating a steam room or sauna into a bespoke basement swimming pool design not only enhances the luxury of the space but also optimizes the health benefits associated with heat therapies. These tailored features elevate the overall experience, creating a wellness-focused retreat right in your home. Whether for relaxation or fitness, a bespoke basement swimming pool offers the flexibility to include additional elements that reflect your personal preferences and lifestyle.
When designing for small basements where space is at a premium, integrating these wellness features requires innovative and practical solutions:
Optimize Layout: Position the sauna or steam room adjacent to the pool for seamless passage from cool to heat therapy, enhancing the fitness and spa experience.
Convertible Spaces: Implement retractable walls or multi-functional furniture to transform the room usage based on need, maximizing the feel of the space.
Integrated Systems: Use combined heating and ventilation systems for both the pool and the sauna or steam room to conserve space and maintain energy efficiency.
What Are the Trends in Swimming Pool Design
What are the latest trends in indoor basement swimming pool designs? Today’s subterranean pools, inspired by the sophistication of a London swimming pool, feature innovations like swimming treadmills with powerful jets, allowing for exercise in compact spaces. Basement swimming pools increasingly incorporate natural light enhancements and strategic lighting, transforming the pool area into a luminous retreat.
For those wondering, “Can you build a swimming pool in your basement?”, the answer is yes—modern designs make it easier than ever to incorporate a pool in basement that’s both functional and stylish. These basement swimming pools are no longer just about utility but are becoming sophisticated, high-end features that enhance a home’s aesthetics and value.
Trend
Description
Natural Swimming Pool
Utilizes bio-filtration for chemical-free water
Swimming Current
Jets create a treadmill effect for exercise
Plant Room Integration
Essential systems housed discreetly
Light Maximization
Amplifies natural light, enhances mood
These features redefine comfort and bring eco-friendly and health-focused benefits to indoor swimming environments.
How to Choose Between a Lap Pool and a Natural Swimming Pool
As homeowners explore the domain of indoor basement swimming pools, selecting the right type—a lap pool or a natural swimming pool—becomes a pivotal decision.
Lap Pool: Ideal for those focusing on fitness, a lap pool in the basement maximizes limited space, allowing for regular swim sessions.
Natural Swimming Pool: Integrates water features and eco-friendly designs, creating a harmonious blend with your home’s natural aesthetics.
Installation costs might be higher due to the complex ecosystem required, but it offers a unique, chemical-free swimming experience.
How to Maintain a Basement Swimming Pool?
Maintaining a swimming pool in the basement requires precise management of chlorine levels and water treatment to ensure the safety and clarity of the water. Innovative technologies, such as smart chemical feeders, can automate the process, providing consistent water quality without requiring frequent manual adjustments.
Additionally, controlling the indoor pool environment with dehumidifiers and proper ventilation systems is crucial. These measures not only prevent structural damage but also promote a comfortable swimming atmosphere, ensuring that your swimming pool in the basement remains in optimal condition year-round.
What Are the Best Practices for Chlorine and Water Treatment
Maintaining the right balance of chlorine and implementing effective water treatment strategies are vital for keeping a basement swimming pool in pristine condition and ensuring safety. Proper management not only safeguards the health of swimmers, including children but also optimizes the pool’s cost and longevity by preventing algae and bacterial growth.
During the basement swimming pool construction, it’s essential to incorporate systems that support efficient water treatment and ensure proper filtration. This ensures the pool remains safe and enjoyable for years, adding long-term value to your home.
Here are the best practices:
Regular Chlorine Checks: Guarantee consistent monitoring of chlorine levels to maintain the recommended range, which is essential for effective disinfection.
pH Balance: Regularly test and adjust the pH level to prevent corrosion and scaling, guaranteeing the effectiveness of chlorine.
Filtration System Maintenance: Keep the water treatment process efficient by routinely cleaning or replacing filters to manage debris and maintain clean water in your new pool or hot tub.
How to Manage Indoor Swimming Pool Environment
To effectively manage the environment of a pool in the basement, controlling humidity levels becomes fundamental, as excessive moisture can lead to structural damage and mould growth. Advanced ventilation systems can enhance air quality and facilitate humidity control, ensuring the space remains comfortable and dry. Heating systems must be calibrated for ideal temperature regulation, which is essential for comfort and energy efficiency. Regular pool maintenance, including precise water treatment, is critical to sustain the optimal conditions for your pool in the basement, ensuring a safe and enjoyable swimming experience.
Feature
Function
Importance
Ventilation
Reduces humidity, improves air
Essential for air quality and structural health
Heating Systems
Maintains water and air temperature
Fundamental for user comfort and energy efficiency
Water Treatment
Guarantees clean and safe water
Crucial for health and pool longevity
These elements collectively guarantee a well-maintained basement swimming pool.
How Much Does a Basement Pool Cost?
The cost of installing a basement swimming pool can vary widely, influenced by factors such as size, materials, design complexity, and additional features like heating or lighting systems. For those wondering, “Can you put a swimming pool in a basement?” the answer is yes, but it’s important to be aware that the indoor basement pool cost tends to be higher than outdoor pools due to challenges such as structural reinforcements, waterproofing, and ensuring proper ventilation.
Comparatively, basement pools typically incur higher expenses than their outdoor counterparts because of these added complexities. Understanding these cost influencers can help homeowners plan and allocate resources more efficiently for such a significant home improvement project.
What Factors Influence Pool Cost
While many homeowners dream of installing a swimming pool in their basement, understanding the various factors influencing the basement pool cost is essential. Installing a basement pool, such as those by Compass Pools, often complements high-end properties and newly constructed London basements, adding a luxurious touch to underground living spaces.
The basement pool cost typically includes expenses related to excavation, structural reinforcements, waterproofing, and installing specialized ventilation and lighting systems. These factors can significantly impact the overall investment, making it important to plan and allocate resources for this substantial home improvement carefully.
Here are some key cost-influencing factors:
Complexity of Construction: The structural challenges of reinforcing a basement to accommodate a pool increase costs.
Materials and Features: High-end finishes and innovative features like adjustable floors can elevate the price.
Size and Design: Larger and more complex designs are more expensive, reflecting the bespoke nature of dream swimming environments within the basement.
Is a Basement Pool More Expensive Than an Outdoor Pool
Considering the unique challenges and requirements, installing a swimming pool in a basement generally incurs higher costs than an outdoor pool. The basement swimming pool costs are higher due to several key factors.
The need for extensive structural reinforcements and advanced waterproofing solutions is crucial to protect the basement floor and walls from water damage. Unlike an above-ground pool or garden-based outdoor pools, basement swimming pools require specialized engineering to guarantee safe water containment and appropriate access.
Additional considerations like integrating a gym or a rest area may further increase the cost of the basement swimming pool. These elements often require further modifications and expenses to ensure everything functions harmoniously.
When designing a basement pool, practical tips include maximizing the available space and installing efficient ventilation systems to handle humidity and chemical odours, further adding to the cost but enhancing the overall functionality and safety of the installation.
Conclusion
Installing a swimming pool in a basement merges luxury with functionality, providing a private aquatic retreat for daily use. Key considerations include structural integrity, ventilation, and waterproofing. Design options range from lap pools to spa-like settings, each enhancing the property’s value and appeal. Regular maintenance guarantees longevity and safety. While initial costs are substantial, the investment pays off in enhanced well-being and home value, making it a practical choice for those seeking innovative home improvement.
Innovative loft storage ideas marry aesthetics with functionality, utilizing built-in drawers, custom shelving, and strategic placements under eaves to optimize spaces. These clever under-eaves storage solutions seamlessly integrate into sloped ceilings and small nooks, enhancing their utility and visual appeal with floating shelves.
Designed to maximize every inch of space while maintaining an uncluttered ambiance, these ideas promise style and practicality. Explore further to uncover additional creative approaches to transform your loft efficiently — especially when planning complementary features like a loft conversion with an ensuite for the perfect bathroom suite.
Key Takeaways
Utilize built-in drawers and custom shelving tailored to fit sloped ceilings and eaves for efficient space use.
Install floating shelves at various heights to optimize and enhance the aesthetic appeal of loft areas.
Incorporate sliding doors on wardrobes and storage units to save space while maintaining easy access to stored items.
Opt for multifunctional furniture such as ottomans with storage and convertible desks to maximize floor space and functionality.
Apply high-performance insulation materials to ensure energy efficiency while integrating storage solutions seamlessly into the loft design.
How Can I Maximize My Attic Space Efficiently?
Maximizing attic space in small lofts demands innovative solutions for maximizing storage space that blends functionality with aesthetic appeal. Whether you’re planning a loft bedroom or designing attic rooms for multiple uses, smart planning is essential.
Utilizing smart storage options like loft eaves storage ideas or fitted cabinets can transform the area into a practical, stylish environment. These attic conversion storage ideas ensure that the space remains functional and beautiful.
For attics with sloped ceilings, clever solutions such as built-in drawers, storage for loft conversion, or custom shelving units make the most of the space beneath the eaves. These tactics help maximize space while maintaining a modern, clutter-free loft feel.
The goal is to maximize storage without sacrificing style—proving that even the most compact attic rooms can become elegant, livable spaces when equipped with well-designed storage features.
What Are the Best Storage Solutions for Small Lofts
Innovative storage solutions are essential for small lofts where every inch counts.
To optimize the available space effectively, it’s vital to implement strategic, visually appealing, and innovative loft conversion storage ideas.
Here are three key solutions:
Eaves Storage: Tailor-made drawers and cupboards that fit into the sloping parts of the loft maximize every available corner, creating much-needed extra space without cluttering the area.
Under-bed Storage: Utilize beds with built-in storage or add stylish, sliding drawers underneath to stealthily store items, enhancing functionality and aesthetic appeal.
Storage Furniture: Opt for multifunctional furniture pieces such as ottomans with storage or convertible desks that save space and add a modern touch to the small loft’s decor.
How to Utilize Vertical Space in a Loft Conversion
How do loft dwellers fully exploit the often-overlooked dimension of their spaces? In loft conversions, maximizing this dimension is essential for enhancing storage capacity while maintaining aesthetic appeal.
Implementing built-in storage solutions that align with sloping ceilings can transform dead zones into useful areas. These are especially important when designing a habitable room, where every inch matters and safety must meet building regulations. Sliding doors on wardrobes guarantee accessibility without sacrificing more space, especially around features like chimney breast fireplaces or sloped walls.
Floating shelves add a modern touch and can be installed at varying heights to accommodate frequently accessed items. At the same time, custom cupboards or modular units around chimney breast fire areas can provide cleverly hidden storage. For more flexible solutions, well-placed freestanding furniture and under-eaves baskets offer style and function.
Those pursuing a basic loft conversion for storage can start small with durable cardboard boxes and labeled bins. However, the space is being developed into a habitable room. In that case, you’ll need to determine your needs carefully and potentially work with a contractor to ensure all design features align with planning permission requirements.
Whether working with a simple loft design or aiming for a high-end finish, a thoughtful layout and clever use of the vertical dimension make loft conversion storage practical and stylish. A good storage strategy can break up large wall areas and create usable niches without overcrowding.
Storage Solution
Benefits
Best For
Floating Shelves
Aesthetic appeal; easy to install
Decorative items, books
Sliding Doors
Space-saving; sleek design
Wardrobes, cupboards
Storage Drawers
Optimizes lower vertical spaces
Seasonal clothing, shoes
These methods increase the practicality of angled ceilings and contribute to a contemporary and uncluttered loft ambiance.
Creative Storage Ideas for Attic Sloped Ceilings
While tackling attic sloped ceilings, homeowners can discover unique opportunities to enhance functionality and style.
The distinctive angles of sloped ceilings in an attic conversion offer an aesthetic that can be harmoniously aligned with space-efficient storage solutions. The attic space transforms into a highly efficient and visually appealing area by focusing on tailor-made installations.
Install Custom-Built Shelving: Maximize the storage potential by installing custom-built storage units that fit snugly under the eaves, turning awkward corners into functional assets.
Utilize Retractable Drawers: Integrate retractable drawers in the loft eaves storage, providing easy access and ideal use of available space.
Incorporate Multifunctional Furniture: Incorporate multifunctional furniture, like benches with hidden storage or storage beds with built-in cabinets, to utilize every inch of the loft conversion.
What Are Some Smart Ways to Store Items in a Loft Conversion?
In loft conversions, integrating floating shelves enhances the aesthetic appeal and provides a seamless solution for additional storage without consuming valuable space. These shelves are especially useful in loft storage room ideas, where making the most of vertical and awkward areas is essential.
Sliding doors can be a sleek, modern choice that maximizes usable area by eliminating the swing space needed for traditional doors. This makes them ideal for bespoke wardrobes or built-in cupboards, particularly in lofts where awkward angles and varying shapes can challenge standard furniture.
Additionally, incorporating storage drawers under sloped ceilings or knee walls plays an essential role in utilizing every possible nook for storage, keeping the space organized and tidy. For example, drawers near the floor level are the perfect place to store Christmas decorations, seasonal equipment, or other belongings that aren’t needed regularly.
In most cases, a loft conversion focused on storage can be tackled DIY, particularly if you’re adding wood shelving or custom-built units that fit perfectly into unused eaves. Just be sure to cover your plans by assessing the weight capacity of walls and floors, especially if you’re storing heavier items.
Adding function doesn’t mean sacrificing style—add shelves that align with your design vision, whether minimal or rustic. A well-planned loft conversion for storage is a practical project that turns even the most limited attic into a highly functional and attractive space. For added inspiration, especially if you’re considering integrating culinary elements, explore these creative loft kitchen ideas to elevate your design.
How to Integrate Floating Shelves for Extra Storage
Maximizing space in loft conversions, floating shelves offer an elegant and practical storage solution that aligns with contemporary design trends. These clever storage options not only enhance the aesthetic of a loft room but also help de clutter the space, providing smart ways to utilize available areas without the bulk of traditional furniture.
Here are three strategic placements for floating shelves in your loft conversion:
Above the Desk: Install floating shelves directly above a work desk to keep essential items within easy reach, creating a functional and streamlined workspace. This simple yet effective solution maximizes space and helps maximise storage by using the vertical area above the desk.
Beside the Bed: Position shelving on the wall beside the bed for books and nighttime essentials, maintaining a clutter-free bedside area. This placement allows you to maximise space without compromising on style, offering more storage for personal items close to hand.
Under the Eaves: Use awkward spaces under the eaves by fitting custom-sized shelves for an efficient storage option that feels intentionally designed. These often-overlooked areas can be transformed into functional storage zones, giving you more storage for seasonal items, sports equipment, or other belongings.
Floating shelves in these areas help in maximising storage space without taking up valuable floor space, making them perfect for those seeking a minimalist approach. If you’re looking for additional clever storage ideas, consider working on a DIY basis to build custom units that make the most of every inch.
For a truly efficient loft conversion, consider utilizing every corner—including spaces like chimney breast fireplaces—to maximise storage and keep the room feeling open and organized. This thoughtful approach can turn any loft into a stylish, functional retreat, giving you the storage you need while maintaining a modern aesthetic.
Can Sliding Doors Help in a Loft Storage Conversion
Integrating sliding doors into a loft conversion can dramatically enhance the space’s storage capability and overall aesthetic. Sliding doors are crucial in maximizing space within a loft storage conversion, offering a sleek, efficient way to access additional storage. Their ability to disappear into walls or overlay seamlessly against them makes them particularly suitable for the often compact dimensions of a loft conversion space.
Feature
Benefit
Aesthetic Impact
Space-saving
Maximizes usable area
Clean, uncluttered look
Accessibility
Easy access to items
Smooth, modern lines
Customization
Tailored to fit unique spaces
Integrates with decor
What Role Do Storage Drawers Play in Maximizing Storage Space
While doors offer an elegant solution for accessing and concealing loft storage, incorporating storage drawers into the design further refines the functionality and style of the space.
Storage drawers are critical in maximizing space in a loft storage room conversion. Here are three ways they enhance the use of the available space:
Efficient Organization: Storage drawers create dedicated compartments for various items, enabling better organization and easy retrieval, utilizing every inch of the loft conversion effectively.
Preservation of Floor Space: Integrating storage drawers in areas like under beds or within staircases provides adequate storage while conserving valuable floor space.
Aesthetic Appeal: Storage drawers can be designed to complement the interior aesthetics, adding a touch of sophistication while serving a practical storage purpose.
How to Make Use of Eaves Storage in a Loft Conversion?
Incorporating eaves storage into a loft conversion seamlessly combines form and function, transforming underutilized spaces into stylish, efficient storage solutions. For those seeking inspiration on how to make the most of sloped areas, loft conversion eaves storage ideas offer a wide range of options to suit different tastes, budgets, and layouts.
Custom-built storage furniture can be tailored to fit snugly into these angular nooks, utilize awkward corners, and work around the existing architecture—maximizing every available inch while maintaining a modern aesthetic. Whether dealing with tricky stairs or limited space, a smart layout is key to keeping your possessions accessible and safely stored.
Exploring built-in options such as drawers, cabinets, or shelving systems guarantees a clutter-free environment that enhances the loft space’s usability and appeal. Items rarely used, like extra cushions, off-season bags, or decorative display pieces, can be tucked away in stacked compartments or shelves.
Some clients may prefer hidden storage that blends with the room’s color scheme, while others might invest in visually appealing solutions that pop as design features. Alternatively, open shelving can highlight items and add personality to the space.
To achieve the best outcome, it’s often worth working with a professional team who can handle the job precisely, ensuring your loft conversion eaves storage works seamlessly with your overall interior design. You can also draw ideas from other smart home upgrades, like how to transform a bathroom on a budget to bring practicality and style into the space.
What Are Effective Ways to Utilize Eaves Space
Maximizing the eaves space in a loft conversion not only optimizes underused areas but also enhances the aesthetic appeal of the room. When planning your loft design, handling the eaves carefully is important, as poorly utilized space can lead to issues later on.
When considering how to utilize this unique area effectively, one can employ innovative storage solutions that transform the space into a functional and trendy loft element. This article offers valuable information and a helpful guide to make the most of your loft eaves while avoiding common pitfalls that can be expensive or difficult to resolve after installation. You may also find inspiration by exploring creative conversion ideas that apply similar space-maximizing principles to other parts of your home.
Built-in Drawers and Cupboards: Install custom-built drawers and cupboards that fit snugly into the eaves, giving your loft a clean, cohesive look while maximizing floor space. It’s a great way to create hidden storage that doesn’t interfere with the room’s layout.
Pull-out Boxes: Utilize sliding boxes on tracks or under eaves, which can be accessed and tucked away when not used. These are particularly effective for storing seasonal products, clothes, or things that aren’t used daily.
Tiered Shelving: Erect tiered shelves that follow the slope of the roof. These offer a beautiful and functional solution for books, decor, or storage baskets and change how the space feels by adding dimension and personality.
If you’re ready to buy materials or invest your time in a DIY build, consider this a smart step toward better organization. Various prefabricated and custom options are available to suit different styles and budgets.
Before you begin, plan carefully and consider your experience level—some installations may require expert help. Doing it right the first time can save you both time and money in the long run.
How Can Storage Furniture Enhance Loft Conversion Storage Ideas
Integrating storage furniture into a loft conversion can profoundly enhance the space’s functionality and aesthetics.
Freestanding units and bespoke designs tailored to the loft conversion room’s unique dimensions can transform previously unused areas into valuable storage spaces, minimizing clutter and maximizing room utility. Handy, strategically placed shelves keep essentials at arm’s reach while contributing to a tidy environment.
This space-saving approach meets diverse storage requirements without compromising the room’s style. The careful selection of furniture—considering material, color, and form—can also reflect current trends, ensuring the loft remains not only organized but also visually appealing.
Such thoughtful incorporation of storage furniture elevates a simple loft conversion into a seamlessly integrated, efficient living space.
What Built-In Storage Options Work Best for Loft Conversions
Several built-in storage options are ideally suited for loft conversions, particularly the use of eaves storage to utilize awkward spaces under the sloping roof effectively.
Every inch of floor area counts in bespoke lofts, making tailored solutions essential for maximizing space.
Custom Shelving: Install shelves that follow the contours of the eaves, turning unusable nooks into a design feature.
Pull-out Drawers: These can be hidden within the eaves, providing large, easily accessible storage without impeding the aesthetic of the newly converted loft.
Built-in Wardrobes: Fitted against sloping walls, these wardrobes maximize storage and maintain a sleek look, seamlessly integrating into the structure of the loft storage room.
London specialists offer expertly crafted, space-saving designs for homeowners looking for premium solutions under eaves cabinets that elevate functionality and style in urban loft conversions.
Are There Loft Storage Ideas That Cause Minimal Disruption?
For those seeking to enhance their loft with minimal disruption, DIY tips offer a cost-effective approach to integrating sleek, hidden storage solutions. Whether you’re just beginning the process or planning a full upgrade, the right strategy can deliver convenience and visual appeal.
Homeowners can declutter their space by focusing on concealed compartments and multifunctional furniture while maintaining a modern aesthetic. These loft conversion ideas storage solutions are especially useful for attics that serve multiple functions, offering a smart combination of practicality and style.
This trend-aware strategy not only optimizes living areas but also aligns with contemporary design preferences. For example, incorporating a skylight can illuminate the space naturally, highlighting smart storage without taking up extra room. Flexible options like foldaway furniture or built-ins that open toward the landing can provide additional utility in tighter layouts.
Homeowners should remember that some projects may require planning permission, particularly when altering structural elements or expanding usable space. Before you begin, it’s important to determine your goals—whether you’re purchasing materials for a weekend project or working with a professional to ensure a complete solution.
Creating functional storage that can handle regularly used items is key to the success of any loft conversion. Consider loft ideas storage like under-eaves drawers or vertical shelving for items you access frequently, while reserving hidden areas for seasonal items.
With the right plan and schedule, even a small loft can become the perfect blend of form and function—don’t forget to enjoy the shopping process along the way!
What Are Some DIY Loft Conversion Tips for Storage
Many homeowners are turning to DIY loft conversion storage solutions that blend functionality with modern aesthetics, ensuring every square inch serves a purpose without extensive renovations.
Optimize Vertical Space: Utilize the height of smaller lofts by installing floor-to-ceiling shelving units. This basic yet effective type of storage maximizes every inch of available space for storage purposes, from books to clothes storage, without consuming valuable floor space.
Under-eaves Cabinets: Tailor storage solutions to fit under the sloped ceilings of a loft. These custom cabinets provide additional space and keep the area tidy and streamlined.
Multifunctional Furniture: Choose pieces like ottomans and beds with built-in storage. These save space while maintaining a chic, uncluttered environment.
How to Create Hidden Storage Spaces in a Loft Conversion
Building on the principles of effective use of space, creating hidden storage areas within a loft conversion can greatly enhance the functionality of this living area without major disruptions.
Utilizing the sloped ceilings typical in lofts, innovative storage ideas like built-in drawers or sliding panels can be seamlessly integrated to avoid wasted space, preserving the aesthetic while maximizing space. These solutions declutter the house and keep seasonal clothing out of sight and orderly.
Additionally, incorporating insulation into these hidden compartments can contribute to reducing energy bills, making the loft conversion not just trend-aware but also energy-efficient.
How can storage solutions also reduce energy bills?
Integrating energy-efficient features into loft storage designs enhances aesthetics and reduces utility costs. Making the best use of space under the roofline is especially important when aiming for functionality and sustainability.
Ideal insulation techniques, when paired with strategic ventilation, can transform a loft into a thermal-efficient space—allowing the area to remain comfortable across every season. Before you proceed, checking building requirements and insulation standards to ensure compliance is essential.
Selecting materials that align with modern energy standards guarantees these conversions are stylish and sustainable. In homebuilding, this means choosing eco-friendly insulation and air-sealing practices that bring long-term savings. Depending on your view of cost versus comfort, the right approach can also increase the value of your home.
For homeowners struggling to understand where to start, it helps to discuss your plan with a renovation director or energy consultant. A solid understanding of ventilation and airflow will support long-term success, especially when creating a storage loft conversion that will be used regularly.
In many cases, setting realistic goals and a timeline is helpful before moving forward with any installations. Whether your goal is to store plenty of seasonal items or create a more organized area, taking the long view helps ensure the finish aligns with your lifestyle.
If your attic is relatively open, consider installing energy-efficient windows that provide light while reducing heat loss. And always remember: when designing for energy efficiency, taking smart early steps helps guarantee comfort for years to come.
What Are the Best Insulation Practices for Loft Conversions
Why should loft conversions skimp on insulation when it’s a key factor in energy efficiency and aesthetic integration?
Proper loft insulation guarantees a comfortable living environment in your newly designed bedroom loft. It greatly reduces heating costs, making it a pivotal feature in maximizing space and enhancing property value.
Choose High-Performance Materials: Opt for insulation materials like spray foam or rigid foam boards that offer superior thermal resistance and seamlessly integrate into the loft design without compromising space.
Seal All Gaps: Confirm that every crevice, nook, and corner is airtight, particularly around windows and the ceiling, to prevent heat loss and maintain a consistent temperature.
Layered Insulation: Implement a multi-layered approach by combining batt insulation with loose fill to optimize energy conservation and soundproofing, transforming your loft conversion into a serene, energy-efficient retreat.
How Does Proper Ventilation Impact Energy Efficiency
After addressing the importance of robust insulation in loft conversions, it’s equally important to contemplate how ventilation plays a role in maintaining energy efficiency.
Proper ventilation in a loft conversion is crucial for maximizing space and ensuring a comfortable, energy-efficient environment.
Innovative storage ideas that integrate ventilation solutions can prevent the buildup of moisture and heat, which, if left unchecked, can lead to increased energy usage and higher bills.
By facilitating a steady flow of air, these storage designs help maintain a balanced temperature, reducing the need for artificial heating and cooling.
This strategic approach not only impacts the overall energy efficiency of the loft but also enhances the longevity and usability of the space, making it a smart, trend-aware choice for homeowners.
What Are the Most Energy-Efficient Materials for Loft Conversions
Selecting the most energy-efficient materials for loft conversions is key to reducing energy bills while optimizing the aesthetics and functionality of the space. When transforming an attic into a vibrant living space, the choice of materials can greatly influence both the cost and the energy efficiency of the new loft conversion.
Insulation: Superior insulation materials like spray foam or rigid panels maintain the desired temperature with minimal disruption and maximize head height, making the space feel larger. It’s wise to assess the insulation’s energy performance rating—often indicated by a label—to ensure it effectively supports year-round comfort.
Windows: Energy-efficient glazed windows reduce heat loss, ensuring the loft is comfortable without excessive heating costs. They also enhance both the amount of space and light. Choosing frames that match the style of your home can increase visual cohesion while allowing for plenty of natural daylight throughout the day.
Flooring: Using sustainable, insulating materials for flooring can help retain heat, making the loft a cozy retreat and effectively utilizing every measure of space. In addition to energy performance, consider how well the flooring fits into your storage ideas for attic conversion, such as hidden compartments or raised platforms that add utility without sacrificing style.
Whether upgrading an existing space or starting fresh, selecting materials that deliver on performance and appearance is always wise. With the right planning and product selection, your loft can become a comfortable, energy-efficient living area that complements your home.
Conclusion
To sum up, transforming a loft into an efficient, aesthetically pleasing storage area to accommodate your daily routine requires creativity and an awareness of modern trends. By utilizing smart solutions like eaves storage and bespoke built-ins, homeowners can maximize this underutilized space without causing significant disruption.
For example, under eaves storage London projects often showcase how tailored solutions can adapt perfectly to the unique architecture of older or urban homes, making the most of awkward angles while maintaining sleek aesthetics.
Additionally, integrating energy-efficient features into storage designs not only optimizes space but also contributes to lower energy bills, merging functionality with sustainability in a stylish, contemporary home.
To correctly lay loft boards without damaging the floor or insulation, ensure the insulation is not compressed and rests evenly between joists with the right tools. Utilize loft legs to elevate the boards above the insulation, maintaining airflow and preventing compression. Secure the boards to the loft legs using an electric screwdriver for a stable platform. This method preserves both the structural integrity of the loft flooring and the effectiveness of the insulation within the roof structure, setting a foundation for potential loft conversions. Further guidance offers ideal approaches to enhance this foundational work.
Key Takeaways
Use loft legs to elevate boards, maintain insulation thickness, and prevent compression during loft flooring installation. This ensures the insulation beneath the boards remains effective and doesn’t lose its thermal properties.
Measure and cut boards accurately to ensure they fit without forcing. Proper loft flooring installation requires precise measurements to avoid gaps or overlaps that could lead to instability.
Drill pilot holes before screwing to avoid splitting the wood and damaging the joists. This step is crucial for preserving both the boards and the structural integrity of the loft during the installation process.
Distribute boards evenly across joists to balance weight and preserve structural integrity. A well-balanced layout helps prevent sagging and maintains the safety of your loft space.
Ensure boards do not cover ventilation areas to maintain adequate airflow. Proper loft flooring installation includes considering air circulation, which is vital for preventing damp and condensation issues.
How to Lay Loft Boards Safely and Efficiently
To guarantee safety and efficiency when laying loft flooring, it is vital to equip oneself with the appropriate tools, including a tape measure, saw, drill, screws, and gloves. Before starting, ensure that your loft’s joists are strong enough to support the new boards in the loft. It’s also a great idea to assess the loft area to determine if the existing boards are in good condition or need replacing.
A detailed, step-by-step guide on how to lay boards in the loft can assist in the proper installation, ensuring that the boards are securely fixed and evenly distributed. This will help you make the most of your floor space while avoiding uneven surfaces, which can be problematic when storing heavier loads. If you’re working near the eaves or around rafters, take care of these areas for obvious reasons.
Additionally, when working with existing insulation, it’s important to raise the boards to prevent compression, which could prevent condensation and maintain the insulation’s warm effectiveness. Installing the boards higher will also ensure you do not disrupt airflow, which is essential for ensuring safety and avoiding condensation in the long run.
Using a pull-down ladder is an excellent way to access the loft safely, and always keep things tidy while working around the walls to avoid accidents. It’s also a good idea to wear gloves to protect your hands from any rough edges or sharp timbers as you move around the loft. When laying the boards, remember that the edge of each board should line up neatly, and you should double-check that everything is in place before walking on the surface.
Finally, ensuring that the timbers are properly spaced will guarantee a strong and stable base, allowing for safe use of the loft area for storage or future living space.
What Tools Do You Need to Board a Loft?
Before beginning the task of laying loft boards, it is essential to assemble the appropriate tools to guarantee both safety and efficiency. Selecting the right equipment will facilitate the installation of loft boards over ceiling joists while preserving the integrity of loft insulation. An electric screwdriver speeds up securing loft boards to the joists, ensuring a firm fit, especially when accessing the loft hatch. Loft legs can raise the loft flooring above the insulation layer, allowing for easy access, preventing compression, and maintaining thermal performance.
Tool Type
Use Case
Electric Screwdriver
Fastening loft boards to joists
Loft Legs
Elevating boards above insulation
Tape Measure
Ensuring accurate placement and fit
These tools are fundamental for efficient loft space utilization and proper installation.
Step-by-Step Guide to Installing Loft Boards
Having gathered the necessary tools as previously outlined, the loft boards can be installed.
Ensure the insulation depth is sufficient and properly laid between the joists or trusses. It’s vital to avoid compressing the insulation, as this diminishes its effectiveness. Install loft insulation carefully above the ceiling joists, focusing on maintaining its loft to preserve energy efficiency and ensure usable storage space.
Next, position the loft legs atop the joists, creating a raised platform that supports the loft boards while preventing insulation compression.
Securely fasten the loft boards to these loft legs, ensuring they are stable and evenly distributed across the roof trusses. This method not only optimizes insulation performance but also enhances the structural integrity of the loft flooring installation.
Most people undertaking this project consider using a dust mask to avoid inhaling particles during installation, as working in confined loft spaces can stir up dust and debris. If you’re unsure about the installation, recommend hiring a professional, especially if structural adjustments are needed or if you want to ensure the job is done efficiently and safely.
How to Raise the Boards Over Insulation
Raising loft boards over insulation in your loft requires meticulous attention to detail to guarantee safety and efficiency. For most loft boarding jobs, utilizing loft legs or stilts is essential to raise the loft floor above the insulation layer. This setup preserves the insulation’s thermal efficiency, ensures things are tidy, and guarantees proper airflow. Using knee pads can be beneficial during this process to protect your knees as you work through the preparation phase.
Installing these supports correctly will create a raised platform, allowing for the placement of loft boards that transform the area into usable loft space without compressing the insulation beneath. This method also ensures a gap between the insulation and the underside of the boards, preventing dampness from developing and ensuring proper ventilation. You’ll need to fill any voids with suitable material to ensure no weak spot or unprotected area.
Once you’ve decided on the correct layout, the length of each board should be measured carefully before securing them with a hammer. For areas around pipes, cut the boards to fit neatly, ensuring airflow is still around these vulnerable areas. Always double-check the placement of the boards to ensure they are aligned correctly.
When finished, the raised platform will not only give you additional usable loft space for storage. Still, it will also help preserve the integrity of the insulation, ensuring that you maintain the loft’s energy efficiency. A well-executed loft boarding installation can also save you money on heating in the long run by preventing heat loss.
As a side note, can I lay insulation over loft boards? It’s generally not recommended unless the insulation is fully protected and does not restrict airflow. Loft boarding jobs should always prioritize your space’s safety and functionality.
What are the Benefits of Loft Boarding?
Loft boarding is essential for homeowners seeking to maximize their attic space and enhance insulation. Installing loft boards across the joists not only secures additional storage areas but also helps protect the thermal integrity of the home, potentially reducing heat loss.
The center of the attic, where the joists are typically stronger, is the ideal place to start the installation. The result is a well-structured loft offering loft storage solutions for your possessions, ensuring you can store items safely and efficiently. If the space is tight, the boards can be laid at this stage while ensuring there are no obstructions, such as pipes or electrical wires.
It’s worth checking that the boards sit fine across the joists, ensuring stability. For deeper attic spaces, you may need to lift the boards higher, creating a more secure platform for your storage. A thorough list of the materials needed beforehand will help you avoid mistakes and ensure everything fits together seamlessly.
At each point of the installation, especially when working around tricky areas, keep in mind that the expansion of wood is a factor, so leave a slight gap between the boards. Doing so will create a more efficient and safer loft storage area. Once installed, you’ve successfully converted your attic into a usable space that adds value to your home.
Why Should You Board Your Loft
Boarding your loft can greatly enhance the usability of your home by optimizing available storage space.
If loft boarding is installed properly, it can create extra storage space. Still, it’s essential to consider how many loft legs are needed without compromising the thermal performance of the current insulation. This is essential as poor loft boarding techniques can lead to compressed insulation, which diminishes its effectiveness and could result in higher energy bills.
By elevating the boards above the insulation, homeowners guarantee that the insulation and loft maintain their intended functions. The benefits of loft boarding include not only additional space and more space for storing items but also maintaining the integrity of the loft’s insulation.
Thoughtful installation maximizes both the extra space and the efficiency of the home’s overall energy use.
Can Loft Boarding Reduce Heat Loss
Can installing loft boards contribute to reduced heat loss in your home? Properly installed loft boards, especially with effective loft insulation in the central area, can alleviate heat loss. The process involves securing loft legs to the joists, guaranteeing that the loft insulation is not compressed, which maintains its insulative properties. Placing loft boards above the insulation then provides an additional thermal barrier. This arrangement minimizes heat rising through the ceiling and escaping through the roof, ensuring it’s not done the wrong way.
To ensure the width of the boards suits the space, it’s a good idea to measure the sheets of insulation and line them up with the joists. You’ll want to avoid any wiring or other obstructions that could be in the way. If unsure, using a temporary work platform will allow you to move more freely and safely. At any point, if you feel the boards are being pushed too tightly into place, take a moment to adjust them so they fit properly without compromising the insulation.
As you install, remember that the loft will likely be used to store suitcases and other stuff, so ensuring the space is organized and free from unnecessary risk is important. If you use the loft frequently, this method will form an ideal storage solution, keeping items off the floor and away from the loft insulation. However, as the process progresses, don’t forget to keep checking back on your past work to ensure everything is in place.
Also, if you’re wondering, can you lay insulation over loft boards—it’s generally not advisable unless the insulation has been correctly protected to maintain its effectiveness. Installing loft decking over the insulation will make the loft more usable. Still, it’s important to suit the type of board used in the area to ensure maximum functionality and energy efficiency.
Factor
Impact on Heat Loss
Loft Insulation
Reduces upward heat transfer
Loft Boards
Adds thermal barrier
Loft Legs
Prevents insulation squash
Installation
Guarantees airtight finish
Loft Hatch
Seals potential heat escape
How Does Loft Insulation Affect Boarding?
Before installing loft boards, it is essential to consider the underlying insulation, as mentioned earlier, which plays a critical role in thermal efficiency and moisture control.
Proper placement and choice of insulation material can prevent heat loss and guarantee that the loft space remains usable and energy-efficient.
Selecting the appropriate insulation for a boarded loft, such as tongue and groove fiberglass or foam board, and correctly installing it below the boarding are pivotal steps to optimize the effectiveness of both the insulation and the loft boarding.
Why Insulate Your Loft Before Boarding
Insulating your loft before laying boards is essential for enhancing energy efficiency and maintaining a stable interior climate.
Ideal loft insulation, typically using loft roll, serves as a barrier that retains heat during winter and repels heat in the summer, greatly reducing heating and cooling costs.
Before initiating a loft boarding project, insulating your loft effectively, especially the top layer, is important to capitalize on these benefits.
Installing loft legs can elevate loft boards above the insulation, ensuring that the insulation’s thickness and effectiveness are not compromised, which is critical for maintaining energy efficiency.
This preparatory step improves the loft area for storage space and sets a solid foundation for potential loft conversion projects.
How to Lay Insulation Below the Boards
When laying insulation below loft boards, it is crucial first to determine the type of insulation material suited for your specific needs. Properly installing insulation beneath the boards guarantees better thermal efficiency and makes the space in the loft more usable.
Here are key considerations:
Install Loft Boards Above the Insulation: Utilize loft legs to elevate the loft boards above the insulation, preventing compression and maintaining the insulation’s effectiveness.
Across the Joists: Confirm insulation spans uniformly across the joists to avoid heat leaks and enhance stability for the storage space above.
Using Loft Panels: Select interlocking loft panels designed for easy installation and ideal fit, confirming they rest securely on the raised framework facilitated by the loft legs.
What is the Best Insulation for a Boarded Loft
Choosing the right type of insulation for a boarded loft is essential, as it not only enhances thermal efficiency but also impacts the structural integrity and usability of the space. Selecting appropriate loft insulation is vital when installing loft boards in an attic space to create a storage area. It must support the weight of loft boards, loft legs, and small boxes without compressing, which can diminish its insulative properties. Start putting the boards in place carefully, ensuring that the insulation is not compromised in the process. Understanding how to board a loft properly ensures that the insulation remains effective, providing long-term energy efficiency while maintaining a sturdy and safe storage area. This careful approach leads to the end result of a fully functional and well-insulated loft that maximizes both storage and energy savings.
Insulation Type
Benefits
Considerations
Fiberglass
Cost-effective, good thermal barrier
Can irritate skin during install
Cellulose
High R-value, eco-friendly
Settles over time, reducing effectiveness
Foam Board
High insulation value, moisture resistant
More expensive, requires careful installation
Each type of insulation interacts differently under loft boarding, affecting the loft space’s overall functionality and energy efficiency.
What Mistakes Should You Avoid When Boarding a Loft?
When boarding a loft, certain missteps can lead to significant issues, such as compromised insulation effectiveness and structural damage. Laying loft boards incorrectly can be a real challenge if not done properly.
Boarding over insulation without proper clearance can impede airflow, leading to moisture problems and reduced thermal efficiency. It’s important to note that using a chipboard for loft boarding might not provide the best airflow, so be prepared to choose more suitable materials. Packs of insulation or boards that are too tight can create unnecessary pressure and may lose effectiveness over time. If you’re unsure at this stage, it’s handy to double-check which way to lay loft boards to avoid costly mistakes.
Additionally, securing boards directly onto joists without considering load distribution or ventilation requirements often undermines the loft’s structural integrity and can obstruct necessary air circulation. If you’re tempted to rush through the undertaking, carefully deal with all tricky spots. A poorly planned layout can make future access impossible and even result in more expensive fixes.
When working on a loft boarding project, be confident in your choices. If you suspect any potential problems, don’t hesitate to contact a professional company specializing in loft conversions. The planning will ensure you don’t face issues down the line, keeping the loft space safe, usable, and effective for years to come.
Can boarding over insulation cause long-term problems
Improper installation of loft boards over insulation can lead to several issues that compromise the structure and efficiency of your home. When planning to lay the first loft board, consider the following:
Weight Distribution: Using loft legs helps to raise the OSB board above the level of insulation, preventing compression and maintaining the insulation’s effectiveness.
Avoiding Damage: Guarantee your loft’s structural integrity by avoiding the direct placement of heavy boards on the insulation, which can lead to dampness and decay.
Maximizing Storage Space: Strategically placed loft boards, supported by loft legs, optimize storage space while ensuring adequate airflow and insulation performance.
Can I board directly onto the joists?
Although it may seem straightforward, boarding directly onto joists is a practice fraught with potential errors that can compromise your loft’s safety and functionality. When laying loft boards, it is vital to avoid placing them directly on the joists without considering the insulation. This can lead to compression of the insulation material, reducing its effectiveness and potentially leading to increased energy costs. Proper installation should raise the boards slightly above the insulation, ensuring airflow is maintained, and the thermal efficiency of the loft is preserved.
Consideration
Importance
Impact
Insulation Integrity
High
Prevents thermal loss
Structural Support
Critical
Guarantees safety and durability
Ventilation
Essential
Avoids moisture issues
Loft boarding can provide valuable storage space in the UK, especially in older properties. Understanding how to lay, loft boards, is fundamental for maximizing space while preserving the underlying structure and insulation effectiveness.
What common errors affect structural integrity or ventilation
Several common errors, particularly around the hatch opening, must be meticulously avoided to guarantee the structural integrity and proper ventilation of your loft when installing loft boards.
Improper Insulation Coverage: Not allowing adequate ventilation around the roof can lead to moisture buildup.
Incorrect Installation Pattern: Failing to lay loft boards in a staggered pattern can compromise the structural integrity.
Blocking Light Fittings and Ventilation Units: Verify that storage areas and loft boards do not cover light fittings or block built-in ventilation units.
Maintaining clear access to these is essential for safety and air circulation.
Understanding the Cost of Loft Boarding
Understanding the expenses associated with loft boarding begins with examining the average cost, which can vary considerably based on several factors. The size of the loft, the type of materials chosen, and the complexity of the installation process all play a significant role in the figure you’ll need to budget for. It’s essential to review these factors carefully before making any decisions.
Some simpler options, like cutting the boards to fit certain spaces, might lower the overall cost when considering fitting loft boards. A tip is to join multiple boards to reduce material waste. As with any project, a short but thoughtful approach will save you time and money in the long run.
It’s also wise to consider whether the initial costs are worth the investment regarding new builds or existing homes. Loft boarding can be a fantastic way to declutter your home by providing more storage space, but it’s important to balance that with the potential for issues like mold if not installed correctly. Be sure to talk to professionals about how to lay loft flooring boards properly to ensure ease during installation and avoid costly mistakes.
While some may recommend opting for DIY installation for a pretty good deal, it’s crucial to hold back if you’re unsure about the complexity of the process. Cut the boards to the correct size, and make sure everything is properly secured. If you want to do it yourself, read up on fitting loft boards properly to avoid mistakes.
By carefully assessing these factors, you can decide whether the extra storage will provide enough value to justify the upfront costs and the potential for added space in the future.
How Much Does Loft Boarding Cost
When considering the installation of loft boards, one must first understand the associated costs, which can vary widely depending on several factors.
Standard Loft Boards: The price of standard loft boards generally determines the base loft boarding cost. It’s important to calculate how many loft boards you will need to cover the desired amount of boarding in your new loft. If you’re unsure, factor in any additional tools or materials you may need for a proper installation.
Loft Legs and Screws: Each loft leg you are fitting requires specific screws. The costs include both the legs and the screws for each loft leg, influencing the total expense. Installing loft legs ensures that the boards are properly elevated above any insulation, preventing them from being compressed and maintaining their effectiveness.
Installation Costs: Installing your loft boards can vary, especially if professional help is sought. Installed loft boards guarantee stability and usability but add to the financial outlay. If you’re doing the job yourself, properly laying loft boards can make all the difference in avoiding future repairs and ensuring safety.
Factors Affecting Loft Boarding Expenses
Several factors notably influence the expenses associated with loft boarding, each playing a vital role in the overall budgeting for the project. Remember, the size of the area to be covered greatly affects the loft boarding cost; boarding an entire loft generally requires more materials and labor than just a section of the loft.
The purpose of the loft—whether it’s for simple storage or as a potential living space—will influence the amount of materials and the quality needed. Many homeowners often overlook this, but it’s crucial to factor in the required strength and quality of materials, especially if you’re storing heavy items.
The presence of a large loft hatch and sufficient access can reduce labor costs, making the installation process easier and quicker. However, warning and access issues can lead to higher costs and delays if you don’t have enough room to maneuver. It’s always wise to check the size and layout before proceeding to avoid unnecessary surprises.
Material choice also impacts expenses. Opting for boards that interlock in a staggered pattern can guarantee stability and minimize waste, which helps keep costs down. However, using cheaper boards may lead to more frequent repairs down the road, so it’s important to weigh these factors.
Additionally, removing old insulation and enhancing loft insulation before boarding is essential for energy efficiency but can increase costs due to the extra labor and materials involved.
One of the common loft boarding mistakes people make is not accounting for the structural integrity of the loft. If you’re unsure about the weight capacity of your loft’s joists, it’s best to consult a professional to avoid any difficult issues. Ensure the space is ready to handle the new loft boards without compromising safety.
Lastly, the need to store items in the loft can dictate the strength and quality of materials used. Heavier items like furniture or boxes will require stronger boards, inevitably influencing the overall budget.
Is It Worth the Investment?
After considering the various factors that affect the costs of loft boarding, homeowners may wonder whether the investment justifies the expense.
Loft boarding cost varies depending on several key elements:
Loft Size and Material Costs: The price per square meter for loft boards and legs can influence the overall expense. Laying loft boards over insulation is a crucial step that adds to the cost, as it ensures that insulation is preserved and not compressed.
Complexity of Installation: Costs escalate if the loft space requires additional measures to safeguard loft insulation or needs structural enhancements. For instance, raising the boards above the insulation to prevent compression can be an added cost, but it helps maintain the insulation’s effectiveness.
Regulatory Compliance: Securing planning permission, if necessary, and ensuring that the conversion of your loft meets building regulations can add to the expense. Loft boards over insulation should be installed with proper clearance to comply with building codes, ensuring adequate airflow and ventilation.
For many, the benefits—such as increased usable space and the retained benefit of their loft insulation—make the investment worthwhile, especially in homes where space is at a premium.
Conclusion
In summary, prioritize the integrity of the underlying insulation and structure when laying loft boards. Use raised loft legs to support boards above insulation, guaranteeing thermal efficiency and avoiding compression. Select moisture-resistant materials and make certain boards are securely fixed, avoiding overloading. Always consult local building regulations to verify compliance, particularly regarding load capacity and fire safety, before you install loft insulation. Proper installation not only maximizes storage space but also contributes to energy savings and the home’s structural safety.
Transforming a garage into a bedroom masterfully combines aesthetics and functionality, elevating the home’s comfort and value while adhering to building regulations. This conversion maximizes living space efficiently by prioritizing natural light through large windows, employing multifunctional furniture, and ensuring year-round comfort with high-quality insulation. Utilizing soft lighting and gentle color schemes enhances the room’s tranquility. The article further explores how these elements harmonize to create an enchanting and practical new living area.
Key Takeaways
Install floor-to-ceiling windows and skylights to enhance natural light and make the space feel larger.
Use multifunctional furniture to optimize space and maintain functionality.
Incorporate high-quality insulation in walls, floors, and ceilings to ensure year-round comfort.
Choose soft, ambient lighting and strategically placed mirrors to create a spacious and inviting atmosphere.
Plan the layout to include ample storage solutions, utilizing vertical space to reduce clutter.
How to Plan Your Garage Conversion Project?
Planning a garage conversion into a bedroom involves several critical steps, including obtaining permission, each demanding careful consideration to balance aesthetics with functionality.
The design process should prioritize creating a comfortable, efficient space that meets the specific needs of its occupants, focusing on elements like lighting, storage, and privacy.
Additionally, understanding the full spectrum of conversion costs—from materials to labor—ensures that the project stays within budget while achieving the desired outcome.
What are the Key Steps to Convert a Garage
Starting a garage conversion requires meticulous attention to detail and a well-thought-out plan to guarantee seamless functionality and aesthetic integration with the existing home. For homeowners looking to transform their garage into extra living space, particularly a bedroom, understanding the key steps involved is crucial.
Step
Description
Obtain Planning Permission
Consult with local authorities to verify compliance with building regulations.
Hire a Garage Conversion Specialist
Engage experts to assess structural integrity and design feasibility.
Plan for Functional and Aesthetic Elements
Choose materials that complement the home and meet functional needs, such as insulating garage floors.
Each phase, from obtaining permissions to the final touches, should be managed by a professional to minimize garage conversion costs and enhance the value of the converted garage.
How to Design a Functional Bedroom
After outlining the foundational steps necessary for a garage conversion, attention shifts to the interior design of the new bedroom space.
When converting a garage into a bedroom, it’s imperative to consider the garage’s existing floor and main structure, assessing whether they are structurally sound enough to support a comfortable, habitable room. Not all garages are immediately ready for conversion, so proper inspection and reinforcement may be required.
Strategic design choices can transform a simple garage into a garage bedroom conversion that adds functionality and aesthetic appeal. Whether converting a tandem garage or a single unit, creating a large bedroom is possible with clever layout planning and an understanding of the available internal dimensions.
Make sure that every element, from lighting to storage, is meticulously planned to maximize the usability of the space as an additional living space. Hiring electricians and a plumber early will ensure that all necessary electrics and plumbing installations meet the same standards as the rest of your home.
Incorporating smart, multifunctional furniture and an optimized layout is essential in making the space feel open and comfortable. For example, using built-in wardrobes or fold-away beds can significantly enhance space efficiency, especially if only half the garage is used for the conversion.
Garage conversions into living spaces are popular in many local areas, offering homeowners a practical way to expand without needing full extensions. In addition to adding usable space, these renovations can increase your property’s value when done correctly.
Don’t forget to evaluate other options, such as connecting the new bedroom to an outdoor space to improve ventilation and natural light. Ensuring the room is suitable for long-term use as a bedroom is critical, and often, the answer lies in careful planning and professional guidance.
Such thoughtful planning guarantees a seamless changeover from a garage to a bedroom, enhancing your home’s comfort and usability.
What are the Conversion Costs
Understanding the financial implications is essential when beginning a garage conversion project. Careful budgeting ensures a successful outcome, whether aiming for a garage-to-bedroom conversion or creating a broader garage-conversion living space.
Here’s a detailed breakdown of the costs involved:
Initial Assessment and Planning: Engage a builder or architectural professional to develop detailed plans and handle permits. This stage typically ranges from $1,500 to $3,000. Though it may seem like an added expense, it’s a cost-effective way to ensure the project complies with local regulations and transitions smoothly from garage to habitable space.
Construction Costs: The total cost of converting a garage can vary depending on location, the existing structure, and your design choices. On average, expect to spend between $20,000 and $50,000. Extra costs can accumulate quickly if you’re in a premium area or plan to include structural changes—like adding a brick wall or expanding the footprint. However, in some places, converting a garage may be cheaper than building a full extension, making it a financially sensible choice for adding square footage.
Interior Finishing and Furnishing: Expect to spend between $2,000 and $5,000 for aesthetic upgrades and comfort. This includes fixtures, flooring, paint, and potentially white goods like a mini-fridge or washer if the space will serve multiple functions. Selecting the right finishes enhances everyday comfort and can also boost your home’s resale value down the line.
Remember that labor costs will form a significant part of your budget. Depending on the scale of the work, some contractors may charge a flat fee, while others work hourly. Discussing this in detail with your builder to avoid surprises is important.
Ultimately, converting your garage is not just about saving money—it’s about adding usable living space smartly and stylishly. Whether you’re after an additional bedroom, office, or guest suite, the right investment can transform your garage into a valuable and livable part of your home.
How Does a Garage Conversion Add Value to Your Home?
Transforming a garage into an additional bedroom not only enhances the aesthetic appeal of a home but also boosts its functional space, potentially increasing its market value and influencing the overall garage conversion price.
Carefully considering the design elements and finishes can markedly elevate the overall allure and usability of the new room. Whether you’re aiming for an en suite, a spacious master, or simply a bit more space for guests or family, thoughtful planning makes all the difference.
To maximize the added value, homeowners should focus on integrating features that align with current market trends and buyer preferences. For example, adding new windows improves natural light and ensures the garage as a bedroom feels like a true extension of the rest of the house.
Hiring a good builder is crucial to ensure the conversion is up to standard. Costs can vary depending on the jobs involved—such as plumbing for a bathroom, installing radiators, or choosing high-quality fittings. You’ll also need to consider other things like insulation, flooring, and electrical work.
Before you start work, it’s important to submit your garage bedroom conversion plans to local authorities—especially if you’re in a conservation area where additional permissions might be needed. The presence of a basement below or the unusual shape of the garage might also determine how the conversion proceeds.
Deciding whether to knock through to the main house or keep the new room separate depends on your long-term goals. Some families keep it distinct for privacy, while others prefer to integrate the space for a more cohesive layout.
Converting a garage can be more involved than it first appears. Even minor details like door thresholds, wall finishes, or whether the walls are prone to scratch or wear can affect the result. But with proper effort, the complete transformation adds long-term value and practical benefit to the rest of your home.
Measuring the available square footage accurately and planning storage solutions ensures the room feels spacious and comfortable. Ultimately, when well-executed, a garage bedroom conversion can turn underutilized space into one of the most valued rooms in the home.
Does Adding an Extra Bedroom Increase Home Value
Converting a garage into an extra bedroom not only caters to the aesthetic appeal of a home but also greatly enhances its market value, provided that it meets building regulations approval.
This transformation is particularly important in garage conversion in the UK, where maximizing property value through cost-effective methods is highly prized.
Increased Property Value: Future buyers often perceive the extra space as valuable, raising the overall property value considerably.
Cost-Effective Solution: Compared to traditional house extensions, converting a garage to a habitable room is a more budget-friendly building project.
Attractive to Buyers: This newly converted space appeals to potential buyers looking for a functional design that smartly incorporates additional living areas without an extensive new construction footprint.
How to Maximize the Garage Conversion Add Value
A well-executed garage conversion can greatly enhance a home’s market value by offering an additional, functional living area that appeals to a broad spectrum of potential buyers.
Transforming an existing garage into a new room, particularly through a double garage conversion, maximizes underutilized garage space.
Careful attention to the aesthetics of the existing garage door and the garage door opening, along with adherence to building regulations, can integrate the new design seamlessly with the home’s existing architecture, boosting curb appeal.
Ensuring the garage conversion adheres to building regulations approval not only enhances safety but also improves energy efficiency, which is highly valued in today’s market.
Ultimately, a garage conversion could increase the desirability and functionality of a property, making it a smart investment for homeowners.
How Do You Make the Space Comfortable Year-Round?
Creating a bedroom from a garage involves meticulous planning to guarantee comfort across all seasons.
Adequate insulation in the walls, floors, and ceilings is vital for maintaining a stable indoor temperature and enhancing energy efficiency.
To further refine the living experience, selecting ideal heating and cooling systems, as well as maximizing natural light and ventilation, are essential considerations.
What Insulation Is Needed for Walls, Floors, and Ceilings
To guarantee year-round comfort in a garage converted into a bedroom, meticulous attention must be paid to the insulation of walls, floors, ceilings, and loft insulation, along with ensuring compliance with building control. This involves aligning with building regulations for garage conversions and ensuring that all materials meet the specific needs of the existing structure.
Walls: Install high-quality insulation materials that comply with existing building codes. Consider adding a damp-proof course to prevent moisture infiltration in a detached garage.
Floors: For an existing concrete garage floor, add a layer of thermal insulation topped with a moisture barrier to enhance comfort and warmth.
Ceilings: Incorporate loft or roof insulation to minimize heat loss, which is essential if the garage has a pitched roof structure.
What Heating and Cooling Systems Work Best
While guaranteeing the structural elements of a garage conversion are well-insulated is essential, selecting the appropriate heating and cooling systems is equally important for maintaining comfort throughout the various seasons.
For integral garages undergoing a conversion, incorporating a ductless mini-split system offers efficient temperature control, minimizing the need for extensive plumbing and electrical work, sometimes advised by a structural engineer. These systems are ideal as they do not require ductwork, which adheres to building control regulations and optimizes space.
Additionally, consider a wall installation with high thermal resistance when replacing the garage door to enhance fire safety and insulation.
How Can You Improve Natural Light and Ventilation?
How does one enhance the influx of natural light and secure proper ventilation in a converted garage bedroom? When tackling a garage-to-bedroom transformation, addressing lighting and airflow is crucial for long-term comfort and habitability. Here are three detailed strategies that meet necessary building standards and elevate the overall conversion of the garage to a bedroom:
1. Install Large Windows
Replace the garage door with large, floor-to-ceiling windows. This means maximizing natural light and significantly improving the aesthetic, transitioning the room from a utilitarian space to a bright, modern living area. If you hope to create a welcoming and stylish bedroom, this change has a huge impact. It’s a big job, so it’s advisable to contact a reputable company or architect early in the process to ensure structural feasibility and energy efficiency.
2. Add Skylights
Skylights are an excellent option, especially if wall space is limited or privacy is a concern. Adding them during your garage conversion to the bedroom can flood the space with daylight and promote natural ventilation. Some skylights can be opened, which helps air run through the room and prevents the space from becoming filled with stale air. This is particularly important if the room is being intended for daily use or sleeping.
3. Incorporate Ventilation Systems
In cases where adding windows or skylights is difficult—such as in terraced properties—you can alternatively use mechanical ventilation systems. Many homeowners use permitted development rights to install these without submitting a full planning application. However, it’s wise to inform your local council or a planning consultant, especially if the property is in a conservation area. Proper ventilation ensures air quality remains high and condensation doesn’t affect the new finishes or furniture.
When comparing your options, share your plans with professionals for a full comparison of cost and practicality. A well-ventilated and naturally lit room will improve the daily living experience and add to the property’s resale value.
Can You Do a DIY Garage Conversion
Undertaking a garage conversion requires a blend of skills, from basic carpentry to more complex electrical work, each vital for transforming a simple space into a functional bedroom.
The advantages of this approach often include cost savings and a personalized touch, while the downsides may involve unexpected challenges and extended timelines.
A careful assessment of one’s capabilities and resources is important before starting a project.
What Skills Are Needed to Convert Your Garage
Initiating a garage conversion into a bedroom requires diverse skills, blending creativity with precision. It may also involve consultations with the local authority, particularly when legal or structural complexities arise.
Whether converting a detached garage or adapting an existing structure into an ensuite bedroom, several capabilities are essential to ensure a smooth and compliant transformation:
Structural Knowledge
Understanding the architectural integrity of the existing structure is critical. You’ll need to review whether any load-bearing walls are involved and determine the size of the new space in relation to the overall property. In many cases, submitting a building notice is required, and consulting a surveyor or structural engineer is highly recommended.
This step ensures safety for garage conversions to bedrooms and prevents issues from arising long after the work is complete. By properly assessing the structure, you help guarantee that the converted area becomes a liveable room that adds real value. Whether you’re creating an extra room for guests or turning it into a valuable living space, attention to these details is key.
Keep in mind that labour cost can vary widely depending on the different jobs involved—from insulation and plastering to electrical work and flooring—so budgeting accurately is essential.
Insulation Proficiency
Knowing how to insulate a garage properly is key to achieving energy efficiency and year-round comfort. It’s not just about wall insulation—floors, ceilings, and even window selections must be carefully planned. Poor insulation can increase utility bills, making the project more expensive. By contrast, a well-insulated space will feel like any other room in the home, even in colder months.
Legal Acumen
Navigating deeds, zoning restrictions, and party wall agreements is crucial—especially when blocking the existing garage door. Every property is different, so it’s wise to determine what regulations apply to your case. For example, homes in conservation areas or listed buildings may face stricter planning controls. Moving ahead without compliance can result in costly setbacks.
When planning, looking at similar projects in your area is helpful to understand what has been successfully turned from a garage to a living space. A good contractor will walk you through your options, ensuring everything from legal paperwork to finishes is aligned with your goals.
While no two garage conversions are exactly the same, there is a variety of resources and professionals available to guide you through the process. Though not always easy, when done correctly, converting a garage into a bedroom can be a strategic and rewarding investment—often less disruptive and more cost-effective than moving.
What are the Pros and Cons of a DIY Garage Conversion
After exploring the skills needed to convert a garage into a bedroom, one might consider whether to undertake this project independently. A DIY garage conversion can be rewarding and economical, allowing a personalized touch to transform the space.
However, the challenges are significant. Integrated garages often require substantial structural alterations, including replacing the garage door with more insulated, wall-like materials. If the garage is too small, expanding the space for adequate living might necessitate complex remodeling that exceeds typical DIY skills.
In addition, converting a garage that is integrated into the home involves meticulous attention to the home’s aesthetic coherence and functional design, ensuring the new bedroom seamlessly blends with the existing architecture while complying with requirements set by the local council.
What are the Differences Between Attached and Detached Garage Conversions?
The distinction between attached and detached structures becomes pivotal when converting a garage into a bedroom.
An attached garage conversion often involves considerations of seamless aesthetic integration with the existing home, ensuring that the design harmonizes both internally and externally.
Conversely, a detached garage offers more flexibility in design and function but requires careful planning regarding access and utilities.
How Does an Attached Garage Conversion Differ
Converting a garage into a bedroom involves several nuanced differences depending on whether the garage is attached to the main house or stands alone as a detached structure.
Here are the distinctions for an attached garage conversion:
Permitted Development Rights: Often, an attached garage conversion may not require full planning permission from the local planning authority, as it is considered part of the existing main house structure.
Integration with Main House: The conversion typically involves more seamless integration regarding aesthetics and utilities, enhancing the overall flow and functionality of the home.
Damp Proofing Needs: Given its proximity and connection to the main house, ensuring proper damp proofing is essential to protect the new living space and the existing structure from moisture-related issues.
What to Consider for a Detached Garage Conversion
While an attached garage conversion benefits from existing connections to the main house, a detached garage presents unique challenges and opportunities for transformation into a bedroom.
When considering converting a detached garage, owners must evaluate the need for utility extensions such as plumbing and electricity, often requiring consultation with a building control officer. The type of garage dictates zoning restrictions and potential permits needed from the local planning office, especially if the structure is a listed building.
Consent may be needed to modify external appearances. Homeowners wanting to convert their garage should also consider keeping the existing garage door for aesthetic integration or replacing it with more conventional walls to optimize insulation and security, balancing storage space and parking space needs with living functionality.
What Are the Best Ways to Finish and Decorate the Space?
When transforming a garage into a bedroom, selecting the right flooring and wall materials is essential for creating a warm, welcoming atmosphere. These foundational elements set the tone for the entire space and should be chosen carefully to suit both function and comfort.
Thoughtful choices like soft, plush carpeting or warm wooden floors, combined with soothing, textured wall finishes, can greatly enhance the room’s coziness in the garage-to-bedroom conversion. This is a great place to start if you’re exploring ideas for garage-to-bedroom conversion. Early on, one of the most important things to confirm is what kind of services—such as underfloor heating or insulation—may be required to support your design choices.
Strategic decorating techniques, particularly in small spaces, can include the use of mirrors to expand the perceived space and soft lighting to add a serene, inviting feel. It’s a good idea to speak with an architect or interior designer to learn how to optimize light and layout in what was once a functional garage.
If you’ve bought a new property and are planning a conversion, get multiple quotes for flooring, plastering, and decorating. Prices can vary depending on your chosen materials and finish, so it’s wise to get advice before purchasing.
And don’t forget one of the most completely transformative elements—wall color. Choosing soft, neutral shades can make the room feel larger and more tranquil, while feature walls or textured panels can add personality without overwhelming the space.
These tips can help turn any cold, concrete-floored garage into a cozy, stylish bedroom that feels like an integral part of the home.
Which Flooring and Wall Materials Create a Warm Feel?
Choosing the right materials is essential for creating a warm atmosphere in a space originally designed for vehicles. Here are three key elements to take into account:
Flooring: Opt for engineered hardwood or thick, plush carpeting. These materials provide excellent insulation and add a visually warm element to the floor, which is vital in most garage conversions.
Wall Materials: Soften the harsh concrete walls typical in single garages using insulated drywall covered with warm-toned paint or elegant wallpaper. This adjustment is not only aesthetically pleasing but also functional, helping to maintain a comfortable temperature.
Ceiling Treatments: Adding architectural elements like wood beams or coffered ceilings can elevate the overall aesthetic and warmth of the room, making the converted space feel less like part of the garage and more like an integral part of the home.
How Do You Make the Room Feel Cozy and Inviting?
To transform a garage into a cozy and inviting bedroom, careful attention must be paid to the finishing touches and decorative elements.
Many garage conversions to bedroom projects overlook the importance of a harmonious design that integrates both aesthetic appeal and functionality. When considering whether a garage conversion is right for your home, factor in all the costs necessary to create a warm ambiance, such as proper insulation and high-quality lighting.
Soft furnishings and strategic color choices can dramatically influence the room’s comfort level. Additionally, you’ll need to check your insurance to guarantee coverage during and after the conversion process, ensuring peace of mind as your garage is transformed into a truly livable space.
What Decorating Tricks Work Best in Small Bedrooms?
While transforming a small garage into a bedroom, clever decorating tricks can optimize the space aesthetically and functionally.
Here are three effective strategies:
Use Multifunctional Furniture: Opt for pieces that serve multiple purposes, such as a bed with built-in storage drawers or a fold-down desk. This minimizes clutter and maximizes usable space.
Implement Light and Neutral Colors: Lighter tones make the room feel larger and more open. Use shades like soft whites, light grays, or pastels to enhance the sense of space.
Incorporate Mirrors Strategically: Placing mirrors to reflect light can visually expand the room. Position them across from windows or in dark corners to brighten the space and create an illusion of depth.
Conclusion
In summary, transforming a garage into a bedroom offers a blend of aesthetic appeal and functional design, and it’s important to consider the overall garage conversion price. By carefully planning the conversion and properly addressing each phase—such as insulation, electrical work, and suitable flooring—homeowners can create a comfortable, year-round living space that enhances property value.
Whether choosing a DIY approach or seeking professional help, attention to detail in finishing and decorating is essential. For garage conversion bedrooms, ensuring quality in materials and craftsmanship makes the space feel like a true extension of the home.
Before getting started, it’s also worth checking if you need planning permission, as regulations vary depending on location and the scope of work. In some cases, you may require approval, especially if the conversion alters the property’s external appearance or if you’re adding plumbing for an en suite.
This type of project not only optimizes underutilized space but also reflects personal style, making it a smart, tailored addition to any home.
Creative kitchen extension ideas empower homeowners to maximize their culinary spaces elegantly. Consider integrating an open-plan layout that blends cooking and dining areas, enhancing functionality and sociability. Installing skylights or large glass panels invites natural light and visually expands the space while incorporating multifunctional islands that can offer additional storage and Seating. For those exploring further transformative possibilities, integrating unique storage solutions or specialized lighting designs could reveal additional layers of sophistication and utility.
Key Takeaways
Consider a single storey kitchen extension with glazed panels to bring in natural light and visually expand the existing space.
Implement an open-plan design to merge kitchen and dining areas, enhancing sociability and creating a multi-functional space.
Integrate a kitchen island for additional storage, seating, and workspace, making the most of the existing space while improving overall functionality.
Use multi-functional fixtures and appliances to maximize efficiency, especially in small kitchens, ensuring the space remains practical and versatile.
Install skylights or strategically placed windows to enhance natural light and space perception, further amplifying the sense of openness in your multi-functional space.
What Are the Key Building Regulations for a Kitchen Extension?
In crafting a kitchen extension, the elegance of design intertwines with the rigidity of building regulations.
Mastery of Building Regulations Approval guarantees the structure not only captivates but also conforms, safeguarding against costly rectifications.
Steering through these standards with precision avoids common pitfalls and elevates the functionality and aesthetic harmony of the return extension in extended space. For a detailed guide, refer to How to Build a Home Extension: Key Steps for House Expansion.
Understanding Building Regulations Approval
Before embarking on a side extension, homeowners must navigate the complexities of approval of building regulations, which ensures safety, functionality, and environmental efficiency. This crucial step shows the importance of complying with the guidelines to guarantee that your kitchen transformation is right.
The approval process includes sections dedicated to scrutinizing the structural elements, ensuring everything aligns with high standards for building integrity and occupant safety. Homeowners need planning permission before starting, which directly impacts the project timeline.
By following this guide and applying for permission early on, people ensure that every part of the modern kitchen extension meets requirements, from the foundation to the finish. This creates a great chance for a bespoke, sustainable space that aligns with aesthetic desires and functionality. A completed extension increases the home’s value and utility, allowing homeowners to enjoy a practical, beautiful kitchen that complies with all regulations.
Compliance with Extension Standards
Understanding the key building regulations for a kitchen extension is vital, as compliance guarantees the new space’s safety and functionality.
When planning a single storey extension, acquiring a lawful development certificate and securing planning permission are essential steps. These approvals confirm that the kitchen extension design meets local architectural standards and usage specifications.
Integrating these requirements can create a seamless blend of aesthetics and practicality in extension ideas. For instance, utilizing natural light through strategically placed windows can meet design aspirations and building code requirements for ventilation and energy efficiency.
Adhering to these guidelines for the ground floor extension enhances the extension’s utility and ensures it adds value to the property while maintaining legal compliance.
Common Regulations Mistakes to Avoid
Why do some kitchen extensions fail to meet expectations? Often, it’s due to overlooked building regulations that are essential for guaranteeing safety and functionality.
When planning your kitchen extension, integrating fire safety measures and a breakfast bar is a legal requirement and a vital component for sustainable living environments. The extension type often dictates specific fire safety protocols, such as the placement of smoke alarms and fire-resistant materials.
Moreover, underestimating the kitchen extension cost can lead to compromises in both design and compliance. Detailed planning should encompass all regulatory expenses to avoid financial oversights.
Savvy homeowners guarantee their kitchen extension projects adhere strictly to local building codes, which cover everything from structural integrity to energy efficiency, thereby maximizing both the aesthetic and practical benefits of their new space.
How Can I Maximize Kitchen Space with an Extension?
Maximizing kitchen space through an extension offers an exciting opportunity to reimagine the heart of the home with innovative layout plans. Whether opting for a single-story rear extension or a side return extension, this expansion can completely transform your kitchen’s functionality. This is an ideal way to increase space and value for terraced properties and detached homes while maintaining harmony with the surrounding environment.
When considering the design, kitchen units can be tailored to suit the new floor level and width, offering a sleek, modern touch. Pitched roofs and slim sightlines help create a spacious, open-plan space, while carefully choosing the color scheme ensures the aesthetic feels fresh and cohesive with the home’s original character. Most kitchen extensions benefit from planning consent, which should be checked with the local authority, especially if you’re in a conservation area or working with a listed building.
A kitchen diner layout elevates the social dynamics of the home, providing ample space for dining and entertaining. Whether incorporating a full width or expanding into a large open space, plan with the help of an architect to ensure the design suits your needs. Start planning your extension with the wow factor in mind, whether by adding extra cabinets, creating a large kitchen, or embracing different levels within the design to add dimension and flow.
This kind of extension perfectly creates a large kitchen that opens up seamlessly to your garden or living area, offering an inviting, functional, and stylish space.
Effective Kitchen Layout Plans
By meticulously crafting an effective kitchen layout plan, particularly focusing on an open-plan kitchen extension, the merging of the kitchen and dining space not only enhances fluidity but also amplifies the functionality of the new space. This type of extension offers a perfect opportunity to achieve a design that caters to the evolving needs of modern homes.
A well-thought-out floor plan should delineate areas, seamlessly integrating cooking, dining, and socializing zones. Strategic placement of appliances, such as in the center stage of the kitchen, can help optimize movement and usability. Additionally, using natural materials and clever storage solutions will further elevate the space’s aesthetic appeal.
Incorporating furniture that fits the space will ensure a harmonious look. At the same time, unique design elements like a roof lantern or glazed roof can help maximize light and create a bright, airy environment. Adding artwork and custom finishes helps personalize the space while maintaining a cohesive feel with the existing rooms.
This approach offers a solution to incorporate modern living within traditional settings for homes like an Edwardian house or semi-detached properties. Consider including features such as new sections that fit seamlessly into your current layout, ensuring plenty of functional storage and counter space. Whether expanding with a single-story extension or exploring permitted development options, these changes will be both important and beneficial for your home’s long-term comfort and appeal.
This design approach allows for creating a well-integrated and stylish kitchen extension that maximizes the use of existing rooms while maintaining an inviting, spacious atmosphere.
Incorporating a Kitchen Island into Your Design
While extending a kitchen, incorporating an island in kitchen extensions boosts functionality and serves as a stylish focal point. Adding an island unit in a new kitchen extension offers a dual solution: it enhances the aesthetic appeal and optimizes the workspace. This central feature is a wise investment, delivering long-term value by improving form and function. The design can be inspired by minimalist principles, creating a clean, streamlined look that complements the rest of the space.
Unlike traditional layouts, where storage can be confined to corners, an island opens up opportunities for more usable space. It can even replace bulky furniture or workstations, simplifying the design and maximizing the kitchen extension ideas to create a more cohesive layout. Whether used for meal prep, casual dining, or socializing, the island becomes a versatile and essential component of your new kitchen.
As you spend time planning, consider the island’s size, style, and material to match your overall vision, and make sure it’s positioned for easy access from all sides. By integrating an island, your kitchen is transformed into a space that is as practical as beautiful.
Feature
Benefit
Consideration
Extra Storage
Maximizes space
Design alignment
Additional Seating
Enhances sociability
Size & placement
Work Surface
Expands prep area
Material choice
In the design of a spacious kitchen, such an island becomes an indispensable component, encouraging a flowing, interactive environment. This structure should resonate with the kitchen design, reflecting the homeowner’s style while ensuring functional excellence.
Creating a Functional Kitchen Diner
Transforming a kitchen through an extension allows homeowners to seamlessly blend dining and cooking spaces, creating a multifunctional area ideal for everyday use and entertaining.
A spacious kitchen diner not only enhances the functionality but also elevates the aesthetic appeal of the home. To maximize the potential of a kitchen diner extension, consider these elements:
Open Plan Layout: Design an open layout to open the space, ensuring a smooth flow between the kitchen and dining area.
Integrated Dining Table: Incorporate a dining table that complements kitchen aesthetics, promoting cohesion and utility.
Strategic Lighting: Layered lighting accentuates architectural features and creates an inviting atmosphere, essential for a modern, spacious kitchen diner.
What Are the Best Extension Ideas for Small Kitchens?
ExploringInnovation is key in exploring the domain of small kitchen extensions; sleek, multifunctional fixtures and hidden storage solutions can transform cramped cooking spaces into efficiency models. A well-planned extension kitchen design can unlock the potential of every square foot, providing the perfect opportunity to create a new room that serves multiple functions.
Selecting the right extension type involves a nuanced understanding of space dynamics, where even a few feet can greatly enhance the kitchen’s functionality without compromising style. For instance, a single-wall layout might be ideal for creating an open, airy space. At the same time, strategically placed windows and doors can enhance accessibility and the connection between the back garden and the kitchen.
Incorporating elements that maximize natural light, such as skylights or strategically placed windows, enlarges the space visually and infuses it with a light-filled, vibrant, airy feel. Full-height glazing can provide unobstructed garden views, bringing the outside in. This approach creates different zones within the room, offering clear separation between cooking, dining, and socializing areas, hugely popular in modern kitchen design.
Consideration of ceiling heights and good ventilation is crucial to ensure an inviting and comfortable atmosphere. By blending practical and aesthetic features, you can take full advantage of permitted development rights, bypassing the need for more extensive planning applications. Whether it’s extending into other rooms or connecting with the dining room, this type of extension offers homeowners a variety of options to increase the flow and functionality of their house.
This holistic design approach, with a combination of well-positioned elements, will ensure that the extension meets your current needs and provides long-term value. With the right brick and color accents, your extension can seamlessly integrate into the existing structure while still making a bold design statement. Most extensions today aim for a harmonious mix of form and function, so don’t expect to settle for anything less than a transformation.
Innovative Small Kitchen Extension Ideas
Maximizing space on the ground floor with ingenuity, small kitchens can be beautifully extended to enhance functionality and style.
The glazed kitchen extension stands out among the most effective small kitchen extension ideas. It introduces abundant natural light and a visual expansion of space without requiring extensive structural changes, making it a great choice for a single storey rear extension.
The side return kitchen extension is another ingenious way to utilize neglected narrow areas alongside the kitchen, transforming them into vibrant dining spaces or utility areas, and integrating seamlessly with the internal spaces of your home.
Glazed Kitchen Extension: This creates an illusion of a larger space with natural lighting, ideal for a single storey extension.
Side Return Kitchen Extension: Efficiently uses narrow outdoor spaces to expand your kitchen and enhance the flow of internal spaces.
Kitchen Diner Extension Ideas: Integrates dining areas seamlessly into the kitchen, fostering a multifunctional space that maximizes the use of internal spaces.
These options expand your kitchen and enhance its aesthetic appeal and practicality, transforming both your internal spaces and outdoor areas.
Choosing the Right Type of Extension
Small kitchens benefit immensely from thoughtful extensions that not only maximize space but also enhance functionality and aesthetic appeal. A popular choice is the single-story rear extension, which seamlessly expands the kitchen into the backyard, offering a new domain of culinary possibilities.
For those who cherish a blend of indoor and outdoor ambiance, consulting with interior designers about glazed kitchen extension ideas is worth considering. These kitchens introduce natural light while connecting the kitchen and living area, creating a fluid, open space.
When planning to add an extension, it’s essential to adapt the design to blend with existing structures, ensuring a harmonious integration that enhances utility and beauty. For more on transforming your home, check out how to find the perfect garage conversion idea for your space.
Designing for Maximum Natural Light
While considering kitchen extensions for small spaces, prioritizing natural light can profoundly impact both the functionality and atmosphere of the area. Harnessing the illuminative power of the sun not only enhances the aesthetic appeal but also promotes a healthier, more welcoming environment.
Here are some innovative ways to maximize natural light:
Roof lights: Installing skylights or roof windows above can flood a compact kitchen with daylight, making the space feel larger and airier.
Glazed doors: Incorporating full-height glazed doors, especially facing south, allows uninterrupted sunlight throughout the day while providing a seamless passage to outdoor spaces.
Glass extension: A glass extension with transparent walls offers a modern solution that brings maximum light and visually expands the area.
How to Plan a Modern Open-Plan Kitchen Extension?
Planning a modern open-plan kitchen extension enhances a home’s aesthetic appeal and merges functionality with style.
By integrating the living space with the kitchen, homeowners can foster a more sociable environment where activities flow seamlessly from cooking to lounging.
Additionally, incorporating elements that connect the indoors with the outdoors can create a fluid progression, elevating the overall spatial experience.
Benefits of an Open Plan Design
Adopting open-plan design extension ideas for a kitchen extension not only enhances the aesthetic appeal but also transforms the functionality of the living space.
This layout seamlessly integrates various home zones, promoting a more fluid shift between the kitchen and living areas and often extending to dining, indoor, and outdoor spaces.
The benefits of such a design include:
Enhanced Social Interaction: Reduces barriers between spaces, fostering communication and social gatherings.
Increased Natural Light: Open spaces allow for an unobstructed flow of light, making the areas appear larger and more welcoming.
Flexible Layout Options: The ability to customize the living space according to changing needs or preferences and adapt effortlessly to different activities and functions.
Integrating Living Space and Kitchen
To effectively integrate living spaces and kitchens in a modern open-plan extension, careful consideration of design elements is paramount. The best way to approach this project is by choosing various features that improve the functionality and overall aesthetic of the space. For example, installing sliding doors can visually expand the room, creating a seamless connection between the kitchen and living areas. These doors allow light to flood the space and give a sense of openness and flexibility.
In the design stage, think about the contrast between materials. A wood finish for the flooring or cabinetry can provide warmth and texture, complementing the more sleek finishes typically found in modern extensions. The existing house should be taken into account, ensuring the new design enhances the original house without overwhelming it.
When planning the roof, a flat roof can be a great solution, particularly with skylights, which help improve light flow. This feature is especially valuable in areas like a south-facing terrace or garden, which can be maximized for sunlight. Adding concealed storage options can improve the aesthetic, keeping the space tidy and functional while maintaining a clean, uncluttered look.
Regarding layout, ensuring a smooth connection between living spaces and the kitchen should be a priority. An open-plan setup can allow for more meters of usable space, making the most of every inch available. The hob, for instance, can be centrally placed in the kitchen to allow the cook to interact with others in the living space, enhancing the area’s social dynamics.
As with any extension of this scale, it’s important to monitor the progress at each stage of construction carefully. The undertaking of such a project may seem expensive, but with the right planning, the final result will be an open-plan extension that blends modern functionality with the charm of the old buildings.
By combining the charm of the original house with new design elements, the result will be a space that both tends to your needs and enhances the overall living experience.
Feature
Benefit
Open-plan layout
Enhances spatial perception and social interaction
Sliding doors
Blurs boundaries, extends visual space
Flat roof
Allows for natural lighting, modern look
Integrated zones
Simplifies movement, enriches usability
Material Palette
Unifies the decor, complements modern aesthetics
This layout optimizes kitchen utility and transforms it into a vibrant hub of the home.
Creating a Seamless Indoor-Outdoor Transition
Building on the idea of an integrated living and kitchen space, a modern open-plan kitchen extension can further enhance the connection between indoor comforts and the beauty of outdoor living.
Emphasizing the seamless shift to the garden space, strategic design choices play a pivotal role. Here are key elements to evaluate:
French Doors: Incorporate French doors to offer a classic, elegant entryway to the garden, enhancing both light and visual flow.
Bi-Fold Doors: Opt for bi-fold doors to create a wide, unobstructed opening that merges the kitchen with the outdoor space, ideal for social gatherings and airy summers.
Rear Kitchen Extension Ideas: Design the extension to complement and interact with the existing garden layout, using materials and styles that blur the boundaries between inside and out.
What Are the Cost Considerations for a Kitchen Extension?
Understanding the financial landscape of a kitchen extension begins with methodically breaking down the costs associated with additional space. The first step is to decide on the project’s scope and ensure that the budget aligns with the vision. This initial stage is crucial to maximize your investment and achieve success.
Budgeting for design and materials demands a keen eye for detail and an appreciation for innovation, ensuring that aesthetics align seamlessly with functionality. For example, timber for beams or cabinetry can balance warmth and durability, while materials like oak or industrial finishes can add texture and character to the space. Whether you opt for a modern conservatory feel or a more rustic look, your material choices will significantly impact the extension’s costs and overall effect.
As you begin to construct, it’s important to consider the range of options available, from pendants to lighting, to enhance functionality and design. The team you choose for the project, including your builder or contractor, will be crucial in helping bring your vision to life. A registered professional can offer inspiration and ensure the work meets the necessary standards while keeping the project within budget.
Exploring cost-effective solutions, such as selecting boxes or modular storage systems for organizations, can significantly lower costs while maintaining a high practicality and style. Submitting the plans for planning approval well in advance can also prevent delays that might increase costs. This is essential in navigating any middle ground between budget constraints and the level of detail you wish to achieve.
The ideas for kitchen extension should also focus on optimizing circulation and openness, ensuring that the space feels expansive without overwhelming the existing layout. Carefully planning the eaves and volume of the extension can also affect how much light is brought into the room, which can be pivotal in maximizing the use of natural resources.
Ultimately, balance is key in deciding between limited options and your extension’s vast potential. With careful planning, your extension can become the center of the home, filled with character and offering a perfect blend of form and function. Depending on your preferences, the project can be characterized by thoughtful details that enhance the everyday living experience.
Breaking Down the Kitchen Extension Cost
Several factors influence the financial outlay required for a kitchen extension, each interplaying to shape the final cost. The dream of expanding your kitchen into a more usable space, incorporating innovative kitchen extension ideas, and creating new space necessitates a detailed financial strategy.
Here are the primary elements:
Size and Complexity: Larger extensions and complex designs greatly increase costs.
Location: Regional differences impact labor and material costs.
Regulatory Requirements: Permits and local building codes can affect the overall expense.
These aspects must be meticulously assessed to guarantee that the transformation of your kitchen into a visually appealing and highly functional area aligns with your budget, maximizing the potential of the extra space without unwelcome financial surprises.
Budgeting for Design and Materials
Having outlined the primary cost elements of a kitchen extension, attention must now turn to the specifics of budgeting for design and materials.
Integrating the new design with the existing property requires a nuanced approach, especially optimizing the additional floor space. Strategic use of materials such as steel beams guarantees structural integrity and influences the overall budget.
These elements are pivotal in creating an open, seamless extension while providing options for additional storage solutions.
Budgeting for design and materials should not only reflect the aesthetic ambition but also accommodate the practical enhancements of the space.
This meticulous planning will ultimately dictate the functional and visual synergy between the old and the new structures.
Finding Cost-Effective Extension Solutions
While seeking cost-effective solutions for a kitchen extension, homeowners must thoroughly evaluate the inherent financial implications.
Strategically planning for a small kitchen extension can yield considerable enhancements with careful budget management. The aim is to create more space without a hefty price tag, focusing on innovative yet affordable design choices.
Utility Room Integration: Incorporating a utility room within the extension plan maximizes functional space and potentially reduces costs by merging multiple needs into one area.
Roof Windows: Installing roof windows instead of full-sized ones can enhance aesthetics and energy efficiency, thereby cutting long-term costs.
Material Selection: Opting for cost-effective materials that still meet aesthetic and durability standards can considerably control expenses, making some of the best kitchen extension ideas achievable within a tighter budget.
How Can I Incorporate Glass Panels in My Kitchen Extension?
Integrating glass panels into a kitchen extension not only enhances the space’s aesthetic appeal but also maximizes the infusion of light and offers expansive views.
Thoughtful design can transform these transparent elements into striking architectural features, seamlessly blending indoor and outdoor environments.
The strategic placement and choice of glass can elevate the functionality and visual impact of the kitchen, making it a luminous focal point of the home.
Benefits of a Glazed Kitchen Extension
A glazed kitchen extension, with its expansive glass panels, not only enhances the aesthetic appeal of a home but also invites an abundance of natural light to the rear garden, creating an illusion of increased space.
This architectural choice transforms kitchen areas into bright, airy spaces, encouraging comfort and functionality. Here are the key benefits:
Maximum Light Penetration: Large glass panels and skylights maximize daylight, reducing the need for artificial lighting.
Seamless Outdoor Connection: Integrates the kitchen with outdoor living areas, offering views and easy access to gardens or patios.
Visual Expansion: Glass creates a continuous visual flow, making the kitchen appear larger and more inviting.
Incorporating glass in a kitchen extension promises a luminous and visually expansive home environment.
Designing with Glass Panels for Aesthetic Appeal
Homeowners can further enhance their aesthetic appeal by creatively incorporating glass panels into their design, building on the natural advantages of glazed kitchen extensions. Using glass panels can transform a space into a sleek new kitchen extension that looks modern, spacious, and elegant. Strategically placed glass panels can partition spaces without closing them off, maintaining an open feel essential in creating a spacious kitchen.
Design Feature
Benefit
Floor-to-ceiling Panels
Enhances spatial perception
Frosted Glass Designs
Provides privacy while maintaining a modern look
Structured Glass Blocks
Adds texture and depth to the best kitchen extension
Enhancing Natural Light and Views
How can the strategic use of glass panels elevate the infusion of natural light and scenic views in a kitchen extension?
Incorporating glass panels in a rear extension, specifically in a single-story kitchen extension or a rear wall kitchen extension, magnifies the spatial perception and enhances connectivity with the outside space.
By designing a double-height space with floor-to-ceiling glass, the extension not only draws in more sunlight but also frames the landscape artfully, creating an illusion of an expansive environment.
Floor-to-Ceiling Windows: Maximize light and view.
Skylights: Introduce additional brightness from above.
Glass Doors: Merge indoor and outdoor spaces.
These elements, when combined with clean lines, contribute to a kitchen that feels both open and luxuriously modern.
Conclusion
To summarize, extending a kitchen enhances functionality and transforms it into a visually engaging space. By adhering to building regulations and carefully defining the goals of the extension, homeowners can ensure they protect both their investment and the property’s structural integrity. Creativity utilizing every inch of space and embracing the best kitchen extension ideas, like glass panels, typically results in a modern, open-plan area ideal for culinary creations and social interactions.
When planning, it’s important to consider the floorplan that maximizes space and flow, ensuring all areas work in harmony. A clear scheme can define the visual direction, making it easier to enjoy the process and ultimately the result.
Homeowners should remember to appoint the right professionals for the job, as this ensures quality services and a smooth construction process. Money management is crucial, so understanding how to balance design, materials, and labor costs is essential.
With thoughtful planning, budget considerations, and a well-executed extension, the kitchen becomes a functional space and a reason to enjoy time spent cooking and socializing. Whether you’re creating a small section for dining or a full-width open-plan kitchen, the right approach will make it a space to enjoy for years to come.